
My grandmother baked bread every Saturday morning using a chipped ceramic bowl, a wooden spoon with a cracked handle, and a dented aluminum pan that had survived three decades of weekly use. Her bread was extraordinary. Not because of those tools. Despite them.
She compensated for bad equipment with sixty years of muscle memory. She knew exactly how the dough should feel between her fingers. She could read oven temperature by holding her hand inside for three seconds. She adjusted every recipe instinctively because her measuring cups were worn and inaccurate.
Most of us don’t have sixty years of compensating experience. We need our baking tools and equipment to work correctly so we can focus on technique rather than fighting our gear. A warped sheet pan that creates hot spots. A measuring cup that’s off by 15%. A whisk with wires that bend under stiff batter. These aren’t minor inconveniences. They’re the difference between consistent results and frustrating unpredictability.
I’ve spent years sourcing kitchen products from manufacturers across China, India, and Southeast Asia. I’ve walked factory floors where baking tools get made. I’ve seen the difference between a $3 whisk and a $15 whisk at the manufacturing level — the steel grade, the welding quality, the handle attachment method, the surface finish. That manufacturing knowledge changes how you evaluate baking tools and equipment when you’re standing in a store or scrolling through product listings.
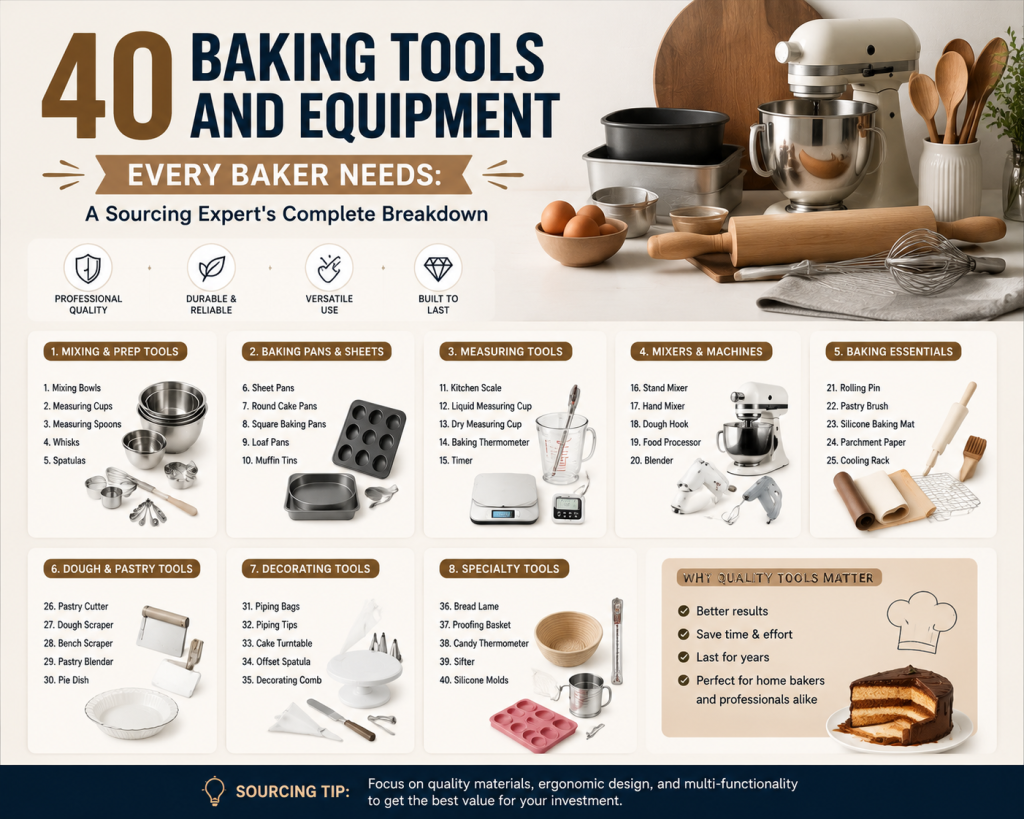
This guide covers 40 essential baking tools and equipment. For each one, I’ll explain what it does, what materials it should be made from, what separates good from bad at the manufacturing level, and what you actually need to spend to get reliable performance. No affiliate links. No brand partnerships. Just honest assessment from someone who’s seen these products get made.
How to Read This Guide
I’ve organized these 40 baking tools and equipment into functional categories: measuring, mixing, preparation, pans, decorating, bread baking, and specialty tools. Within each category, tools are ordered roughly by importance — the ones you’ll use most frequently come first.
For each tool, I cover:
What it does and why you need it. What material it should be made from. What to look for when buying (quality indicators). What to avoid (red flags). Approximate price range for acceptable quality. Care and maintenance basics.
If you’re building a baking toolkit from scratch, skip to the “Building Your Baking Toolkit” section at the end for a prioritized buying sequence. If you’re upgrading specific tools, jump directly to the relevant item.
Measuring Tools
Baking is chemistry. Unlike cooking, where you can adjust seasonings by taste and add ingredients by feel, baking requires precision. Too much flour makes cake dense. Too little sugar prevents proper browning. Wrong oven temperature ruins everything regardless of how perfectly you measured and mixed.
Accurate measuring tools are the foundation everything else builds on. Invest here first.
1. Digital Kitchen Scale
A kitchen scale is the single most important baking tool most home bakers don’t own. Professional bakers measure everything by weight. Not by volume. Not by cups and tablespoons. By grams.
Here’s why this matters. A cup of flour can weigh anywhere from 120 grams to 160 grams depending on how you scoop it, whether you sifted it, how humid your kitchen is, and how settled the flour is in its container. That’s a 33% variation from the same “one cup” measurement. In a recipe calling for three cups of flour, you could be off by over 100 grams. That’s enough to turn a tender cake into a dense brick.
A scale eliminates this variable entirely. 150 grams of flour is 150 grams of flour regardless of how you put it on the scale.
What to look for: Capacity of at least 5 kilograms (11 pounds) to handle large batches. Resolution of 1 gram minimum — 0.1 gram resolution is better for small quantities like yeast and leavening agents. Tare function (zeroing the scale with a bowl on it) is essential. A flat platform large enough to hold a mixing bowl without blocking the display. Response time under 2 seconds — slow scales make measuring multiple ingredients tedious.
Materials and construction: The platform should be stainless steel or tempered glass for easy cleaning. Plastic platforms stain and scratch over time, developing grooves that harbor bacteria. The load cell (the sensor inside) should be a strain gauge type for accuracy and longevity. Cheap scales use springs that lose calibration over time. Quality scales use precision strain gauges that maintain accuracy for years.
What to avoid: Scales with maximum capacity under 3 kilograms — you’ll exceed this with a heavy bowl plus ingredients. Scales without a tare button. Scales with raised buttons around the platform that trap flour and liquid. Scales that auto-shut-off after 30 seconds — you need at least 2-3 minutes of active time when measuring multiple ingredients sequentially.
Price range: $15-25 gets a reliable home baking scale. $30-50 gets professional-grade accuracy with 0.1g resolution. Below $10, accuracy becomes unreliable and build quality suffers. You don’t need to spend $100 unless you’re doing commercial production requiring certified calibration.
Care: Keep liquid away from the battery compartment. Store flat, never with weight on the platform. Replace batteries when the display dims — low battery voltage causes inaccurate readings before the low-battery indicator appears.
2. Measuring Cups (Dry)
Even with a scale, you’ll use dry measuring cups. Many recipes still list volume measurements. And for casual baking — a batch of cookies on a Tuesday evening — sometimes scooping a cup of flour is faster than pulling out the scale.
Dry measuring cups are designed to be filled to the brim and leveled off with a straight edge. This is fundamentally different from liquid measuring cups, and the two are not interchangeable for accurate measurement.
What to look for: A nested set including 1/4 cup, 1/3 cup, 1/2 cup, and 1 cup. Straight sides and flat rims for accurate leveling. Long handles that don’t bend under the weight of packed brown sugar. Clearly engraved (not printed) measurements that won’t wear off after washing. A handle design that lets you level the top without your knuckles hitting the rim.
Materials and construction: Stainless steel is the best material for dry measuring cups. It doesn’t warp, doesn’t absorb odors, doesn’t stain, and maintains its shape for decades. The gauge (thickness) of the steel matters — thin steel (0.4mm) dents easily and the rims bend, making leveling inaccurate. Look for cups made from 0.6-0.8mm stainless steel. The handle should be welded or riveted to the cup body, not spot-welded with a single point that breaks under stress.
Plastic measuring cups work but degrade over time. They warp in dishwashers, develop scratches that make reading measurements difficult, and can absorb oils that affect flavor in delicate baking.
Ceramic measuring cups look beautiful but chip easily and the measurement markings are often decorative rather than precise.
What to avoid: Cups with rolled rims (the edge curls inward) — these make leveling imprecise because flour catches in the rolled edge. Cups with printed measurements instead of engraved ones. Cups where the handle attaches at a single point — these break. Novelty shapes that sacrifice accuracy for aesthetics.
Price range: $8-15 for a reliable stainless steel set. $20-35 for heavy-gauge professional sets with additional sizes (2/3 cup, 3/4 cup, 1.5 cup, 2 cup). Below $5, you’re getting thin metal that dents on first use or plastic that won’t survive a year of regular use.
Care: Hand wash or dishwasher safe for stainless steel. Dry immediately to prevent water spots that obscure measurement markings. Check periodically that cups haven’t dented — a dented cup holds less than its marked volume.
3. Liquid Measuring Cups
Liquid measuring cups have a pour spout and measurement markings on the side, designed to be read at eye level with the cup sitting on a flat surface. You fill to the line rather than to the brim. This design prevents spilling and allows accurate measurement of liquids that would overflow a dry measuring cup.
What to look for: A set including 1-cup (250ml), 2-cup (500ml), and 4-cup (1 liter) sizes covers most baking needs. Clear markings visible from multiple angles. A comfortable handle that stays cool. A pour spout that actually directs liquid without dribbling down the side. Markings in both cups/ounces and milliliters for recipe flexibility.
Materials and construction: Borosilicate glass (like Pyrex) is the traditional choice — heat resistant, microwave safe, doesn’t stain, and lasts decades. The measurement markings should be fired into the glass, not painted on. Painted markings fade in the dishwasher within months.
Plastic (Tritan or polycarbonate) measuring cups are lighter and shatterproof. Good for households with children or for measuring hot liquids you’ll microwave. Look for BPA-free certification. The markings should be molded into the plastic, not printed.
What to avoid: Thin soda-lime glass that cracks with temperature changes. Cups with markings only on one side (you have to rotate the cup to read it every time). Cups without a pour spout. Cups where the handle is glued rather than molded as part of the piece.
Price range: $5-12 for a single quality glass measuring cup. $15-30 for a three-piece set. Borosilicate glass costs more than soda-lime glass but survives thermal shock (pouring hot liquid into a cold cup, or moving from fridge to microwave).
Care: Borosilicate glass is dishwasher safe. Avoid extreme temperature shocks even with borosilicate — don’t put a frozen measuring cup directly into a hot oven. Plastic cups should be replaced when markings become difficult to read or when the plastic develops cloudiness that obscures measurement lines.
4. Measuring Spoons
Measuring spoons handle the small quantities that a kitchen scale struggles with at 1-gram resolution: baking powder, baking soda, vanilla extract, salt, spices. A quarter teaspoon of baking soda weighs about 1.5 grams — within the margin of error for most home scales.
What to look for: A set including 1/4 teaspoon, 1/2 teaspoon, 1 teaspoon, and 1 tablespoon at minimum. Better sets add 1/8 teaspoon, 3/4 teaspoon, and 1/2 tablespoon. Narrow enough to fit inside spice jars (many standard spoon sets are too wide for standard spice jar openings). Flat bottoms that let you set a filled spoon down without spilling. Long handles for reaching into deep containers.
Materials and construction: Stainless steel, same reasoning as dry measuring cups. The spoon bowls should be deep enough to hold their stated volume when leveled — shallow spoons require heaping to reach correct volume, which defeats the purpose of measuring. Handle-to-bowl connection should be solid, either one-piece stamped construction or securely welded. Riveted connections on measuring spoons tend to loosen over time because the spoon bowls are small and the leverage on the handle is significant relative to the rivet size.
What to avoid: Spoons connected by a ring that you have to fight to separate. Spoons with measurement markings only on the handle (hard to read when your hands are covered in flour). Spoons with decorative shapes that make leveling impossible. Plastic spoons that warp in hot liquids.
Price range: $6-12 for a quality stainless steel set. $15-25 for professional sets with additional sizes and magnetic storage. Avoid sets under $4 — the metal is typically so thin that the spoon bowls deform when scooping packed ingredients like brown sugar.
Care: Hand wash or dishwasher. Check periodically that spoon bowls haven’t bent or dented. A deformed spoon bowl changes the volume it holds.
5. Oven Thermometer
Your oven lies to you. The temperature displayed on your oven’s control panel rarely matches the actual temperature inside the oven cavity. Most home ovens are off by 15-25 degrees Fahrenheit. Some are off by 50 degrees or more. This isn’t a defect — it’s just the reality of how consumer oven thermostats work.
An oven thermometer hangs from your oven rack or sits on the rack surface, giving you the actual air temperature where your food bakes. This single tool eliminates one of the most common sources of baking failure: wrong temperature.
What to look for: A dial thermometer with a range of at least 200°F to 500°F (100°C to 260°C). Large, easy-to-read numbers visible through the oven window without opening the door. A hook or base that keeps it stable on the rack without falling when you slide pans in and out. Accuracy within ±5°F — check reviews for accuracy complaints.
Materials and construction: The housing should be stainless steel to withstand constant high heat without degrading. The sensing element is typically a bimetallic coil that expands and contracts with temperature changes, moving the dial needle. Quality thermometers use precision-wound coils that maintain accuracy over years. Cheap ones use loosely wound coils that drift out of calibration within months.
The dial face should be printed on metal or high-temperature-resistant material. Plastic dial faces yellow and become unreadable after months of oven exposure.
What to avoid: Digital oven thermometers with plastic housings — the electronics and plastic degrade in sustained high heat. Thermometers with small dials that require opening the oven door to read (opening the door drops oven temperature 25-50°F instantly). Thermometers without a secure mounting method that fall and break.
Price range: $7-15 for a reliable analog oven thermometer. This is one tool where expensive doesn’t mean better — a $7 thermometer from a reputable brand works as well as a $30 one. The mechanism is simple and well-understood. Just avoid the $2-3 versions with poor calibration.
Care: Leave it in the oven permanently. No maintenance required. Replace if the needle sticks or if you notice it reading significantly different from a known-accurate reference thermometer.
6. Instant-Read Thermometer
An instant-read thermometer tells you the internal temperature of what you’re baking. Bread is done at 190-210°F internally. Custard sets at 170-180°F. Cheesecake should reach 150°F in the center. These temperatures are far more reliable indicators of doneness than time, color, or the “toothpick test.”
What to look for: Response time under 3 seconds (true instant-read). Temperature range of at least 32°F to 450°F (-0°C to 230°C). Thin probe tip that doesn’t leave large holes in bread or cake surfaces. Backlit display for reading inside a dim oven. Hold function that locks the reading when you pull the probe out. Waterproof rating for easy cleaning.
Materials and construction: The probe should be stainless steel with a pointed tip. The sensing element (thermocouple or thermistor) sits in the last 1-2 centimeters of the probe tip — this is the part that must be fully inserted into the food for accurate reading. Thermocouple sensors respond faster than thermistors but cost more. For baking purposes, either technology works fine since you’re not measuring rapidly changing temperatures.
The housing should be water-resistant at minimum. Flour, butter, and batter will get on this tool constantly. If it can’t handle a rinse under running water, it won’t last in a baking environment.
What to avoid: Dial-type probe thermometers marketed as “instant read” — they take 15-30 seconds to stabilize, which is not instant. Thermometers with thick probes (over 3mm diameter) that leave visible holes in finished baked goods. Thermometers without auto-shutoff that drain batteries when forgotten in a drawer.
Price range: $15-30 for a quality instant-read thermometer suitable for baking. $35-100 for professional-grade with faster response times and higher accuracy. The $15-30 range serves home bakers perfectly. Below $10, response times slow dramatically and accuracy suffers.
Care: Clean the probe with warm soapy water after each use. Don’t submerge the housing unless it’s rated waterproof (not just water-resistant). Store with the probe protected — a bent probe tip affects insertion and can damage the internal sensor.
Mixing Tools
Once you’ve measured accurately, mixing is where ingredients transform into batter, dough, or filling. The right mixing tools give you control over texture — from gently folding delicate meringue to aggressively developing gluten in bread dough. Each tool in this category serves a specific mixing purpose that others can’t replicate well.
7. Stand Mixer
A stand mixer is the largest investment in most bakers’ toolkit and the one that transforms what’s possible in a home kitchen. Tasks that require 15-20 minutes of hand mixing — creaming butter, kneading bread dough, whipping egg whites — happen in 3-5 minutes with consistent results and no arm fatigue.
What to look for: Motor power of at least 300 watts for light baking (cookies, cakes). 500+ watts for bread dough and heavy batters. Bowl capacity of 4.5-5 quarts for home baking (handles double batches of most recipes). 6-7 quarts for serious home bakers or small commercial operations. Planetary mixing action (the attachment orbits around the bowl while spinning on its own axis) for thorough, even mixing without scraping. A tilt-head or bowl-lift design — tilt-head is more convenient for home use, bowl-lift is sturdier for heavy doughs. Three standard attachments: flat beater (general mixing), dough hook (bread), and wire whip (eggs, cream).
Materials and construction: The housing should be die-cast metal (zinc alloy or aluminum), not plastic. Metal housings absorb vibration, add stabilizing weight, and last decades. Plastic housings crack, flex under load, and “walk” across the counter during heavy mixing.
The bowl should be stainless steel. Glass bowls are heavy, breakable, and don’t conduct cold well for whipping cream. Ceramic bowls chip. Stainless steel is light, durable, and easy to chill in the freezer before whipping.
The gear system inside is what separates a mixer that lasts 20 years from one that burns out in 2. All-metal gears (steel or bronze) handle sustained heavy loads without stripping. Nylon gears are quieter but wear faster and can strip under heavy bread dough loads. This is the single most important quality differentiator in stand mixers, and it’s invisible from the outside. Research the internal gear material before buying.
The attachment hub should be metal with a secure locking mechanism. Attachments that wobble during operation create uneven mixing and accelerate wear on both the attachment and the hub.
What to avoid: Mixers under 250 watts — they’ll stall on bread dough and overheat on thick cookie dough. Mixers with plastic gear systems marketed as “heavy duty.” Mixers without a splash guard or pouring shield (you’ll coat your kitchen in flour on the first use). Mixers where the bowl doesn’t lock securely into position.
Price range: $200-350 for a quality home stand mixer with metal gears and adequate power. $400-700 for professional-grade with higher power, larger capacity, and commercial-rated motors. Below $150, you’re getting plastic gears, weak motors, and a machine that won’t survive regular bread baking. The $250-350 range represents the sweet spot for serious home bakers who bake weekly.
Care: Wipe the housing after each use — batter splashes harden into cement if left overnight. Never submerge the motor housing. Wash attachments by hand or dishwasher. Lubricate the attachment hub annually with food-grade grease if it starts feeling stiff. Don’t overload beyond the manufacturer’s stated dough capacity — this is the primary cause of gear failure.
8. Hand Mixer
A hand mixer fills the gap between a stand mixer and manual whisking. It’s lighter, cheaper, takes up less storage space, and handles most mixing tasks adequately. For bakers who don’t bake frequently enough to justify a stand mixer, or who need a portable option for mixing in different bowls and pots, a hand mixer is the practical choice.
What to look for: Motor power of at least 200 watts. Multiple speed settings (5-9 speeds) for control over mixing intensity. A slow start feature that prevents flour explosions when you first engage the beaters. Beaters that eject with a single button press for easy cleaning. A flat base or heel rest that lets you set the mixer down without the beaters touching the counter. Comfortable grip that doesn’t vibrate excessively at high speeds.
Materials and construction: The beaters should be stainless steel wire construction, not stamped flat metal. Wire beaters incorporate more air and mix more efficiently than flat beaters. The housing is typically plastic (acceptable for hand mixers since they’re not bearing heavy loads continuously). Look for reinforced plastic around the motor vents and beater sockets — these are stress points that crack on cheap models.
The cord should be at least 4 feet long. Shorter cords limit your positioning relative to outlets and create tension that pulls the mixer. A swivel cord base prevents tangling.
What to avoid: Mixers with only 3 speed settings — you need gradual speed control for different tasks. Mixers where beaters require tools to remove. Mixers without a slow-start feature (first speed should be genuinely slow, not medium). Mixers that overheat after 5 minutes of continuous use — check reviews for overheating complaints.
Price range: $25-50 for a reliable hand mixer suitable for regular baking. $50-80 for premium models with more power and better ergonomics. Below $20, motors are weak, speed control is poor, and the units overheat quickly. A $35-45 hand mixer from a reputable brand serves most home bakers well for years.
Care: Eject and wash beaters immediately after use — dried batter is difficult to remove from wire beater construction. Wipe the housing with a damp cloth. Never submerge. Store with beaters detached to prevent bending during storage. Replace beaters if wires bend or break — bent beaters create imbalanced rotation that stresses the motor.
9. Mixing Bowls
You need more mixing bowls than you think. A single recipe often requires three or four: one for dry ingredients, one for wet ingredients, one for the combined batter, and one for a component like whipped cream or egg whites. A good set of nesting bowls in graduated sizes covers all scenarios without cluttering your cabinets.
What to look for: A set of at least 5 bowls ranging from 1.5 quarts to 5+ quarts. Flat bottoms that sit stable on the counter without spinning during vigorous mixing. Enough weight to stay put when you’re whisking with one hand. Pouring spouts on at least the larger bowls. Non-slip bases (silicone ring on the bottom) are helpful but not essential. Bowls that nest compactly for storage.
Materials and construction: Stainless steel is the professional standard. Light,
complete blog
unbreakable, non-reactive with acidic ingredients (lemon juice, buttermilk, vinegar), and easy to sanitize. Stainless steel also chills quickly in the freezer — useful for whipping cream. Look for 18/8 or 18/10 stainless steel (the numbers indicate chromium/nickel content). Higher nickel content means better corrosion resistance and a shinier finish that’s easier to clean.
Glass bowls (tempered soda-lime or borosilicate) are heavier but let you see your mixture from all angles. They’re microwave-safe for melting butter or chocolate directly in the mixing bowl. The weight provides stability during hand mixing. Downside: they break when dropped, and the weight becomes tiring when pouring batter.
Ceramic bowls retain temperature well (good for proofing bread dough in a warm bowl) but are heavy, breakable, and often not perfectly round — which matters if you’re using a hand mixer and the beaters hit the side.
Plastic bowls are the worst choice for baking. They absorb oils and odors, scratch easily (scratches harbor bacteria), stain from turmeric and food coloring, and — critically — residual grease on plastic bowl surfaces prevents egg whites from whipping properly. If you whip meringue in a plastic bowl, you’ll get less volume and less stability than in glass or metal.
What to avoid: Bowls with narrow bases that tip easily. Bowls without flat bottoms (rounded bottoms require a towel ring to stabilize). Plastic bowls for any serious baking. Bowls with decorative textures inside that trap batter in crevices. Bowls that aren’t dishwasher safe if that matters to your workflow.
Price range: $20-40 for a quality 5-piece stainless steel nesting set. $30-60 for glass sets. $50-100 for premium sets with lids, non-slip bases, and measurement markings. Individual professional-grade stainless bowls (heavy gauge, flat bottom, wide rim) run $8-15 each. Below $15 for a set, the steel is paper-thin and the bowls dent, flex, and spin during mixing.
Care: Stainless steel is dishwasher safe and virtually indestructible. Glass requires careful handling — inspect for chips that could break further during use. For egg white whipping, wipe stainless or glass bowls with a paper towel dampened with white vinegar before use to remove any invisible grease film.
10. Whisk
A whisk incorporates air into mixtures and breaks up lumps that a spoon or spatula would just push around. Different whisk shapes serve different purposes, and owning two or three covers the full range of baking tasks.
Balloon whisk: The most common type. Bulbous shape with many thin wires creates maximum air incorporation. Use for whipping cream, beating eggs, combining dry ingredients (more effective than sifting for breaking up flour lumps in many cases), and making smooth custards and pastry cream.
French whisk: Narrower and more elongated than a balloon whisk. Fewer wires, slightly thicker. Better for reaching into the corners of saucepans when making stovetop custards, curds, and sauces. The narrower profile fits inside smaller vessels.
Flat whisk (roux whisk): Wires arranged in a flat plane rather than a balloon shape. Designed for deglazing pans and making roux, gravy, and pan sauces. Less useful for pure baking but valuable if you make stovetop components like pastry cream or caramel sauce.
What to look for: Wire count of at least 8-10 for a balloon whisk (more wires = more air incorporation). Wire thickness that balances flexibility with strength — too thin and wires bend permanently, too thick and the whisk feels stiff and doesn’t incorporate air well. A comfortable handle at least 5 inches long that provides good grip when your hands are wet or greasy. Sealed handle-to-wire junction that doesn’t trap water and food inside (a common hygiene problem with cheap whisks).
Materials and construction: Stainless steel wires are standard and correct for baking. The wires should be smooth and uniformly shaped — run your finger along each wire checking for rough spots or burrs that would scratch bowl surfaces. The junction where wires meet the handle is the critical quality point. On quality whisks, wires are welded into a solid collar that’s then permanently attached to the handle. On cheap whisks, wires are simply crimped into a hollow handle with a cap — these come apart, trap food inside, and rust internally.
Handle materials: stainless steel (durable, dishwasher safe, can be slippery when wet), wood (comfortable grip, not dishwasher safe, can crack), silicone-coated (good grip, heat resistant, easy to clean), or polypropylene plastic (adequate, lightweight, dishwasher safe).
Silicone-coated wire whisks exist for use in non-stick cookware. They’re fine for stovetop work in coated pans but less effective for whipping because the silicone coating makes wires thicker and reduces the number that fit in the balloon shape.
What to avoid: Whisks with fewer than 6 wires (insufficient for air incorporation). Whisks where the handle junction isn’t sealed (food and water get trapped inside, creating mold and bacteria). Whisks with wires that bend permanently after one use in thick batter. Whisks with sharp wire ends that scratch bowls.
Price range: $8-15 for a quality balloon whisk. $12-20 for a professional-grade French whisk. $20-35 for a set of two or three different styles. Below $5, wire quality is poor — they bend, the junction isn’t sealed, and the whisk becomes unsanitary within months.
Care: Wash immediately after use — dried egg and batter between wires is extremely difficult to remove once hardened. Dishwasher safe for stainless steel models with sealed junctions. Store hanging or in a utensil crock — don’t store in a drawer where other utensils press against the wires and deform them.
11. Rubber Spatula
A rubber spatula (more accurately, a silicone spatula in modern versions) is your tool for folding, scraping, and transferring. Folding whipped egg whites into batter. Scraping every last bit of batter from the mixing bowl into the pan. Stirring custard on the stovetop without scratching the pan. Spreading batter evenly in a pan. No other tool does these jobs as well.
What to look for: A one-piece construction where the head and handle are molded as a single unit with no seam or joint. This is the most important quality indicator for spatulas. Two-piece spatulas (head attached to a separate handle) eventually separate at the joint, trapping food and bacteria in the gap. One-piece silicone spatulas eliminate this problem entirely.
Head flexibility that’s firm enough to scrape effectively but soft enough to conform to bowl curves. A head that’s too floppy can’t push thick batter. A head that’s too stiff can’t reach into bowl corners.
Heat resistance to at least 450°F (230°C) for stovetop use. Not all silicone spatulas are heat-rated — check the specific temperature rating. Standard silicone handles 450-500°F. Some budget spatulas use silicone blends that degrade at lower temperatures.
Size: own at least two. A large spatula (head about 3.5 x 2.5 inches) for folding and scraping mixing bowls. A small spatula (head about 2 x 1.5 inches) for scraping jars, small bowls, and food processor containers.
Materials and construction: Food-grade silicone is the correct material. It’s non-reactive, heat resistant, flexible, non-stick, and doesn’t absorb odors or stains (mostly — very strong spices like turmeric can stain even silicone). The silicone should feel smooth and slightly tacky, not slippery. Slippery silicone often indicates lower-grade material or added fillers.
Some spatulas have a silicone head on a nylon or wooden handle. These work fine but the junction between materials is a potential failure point and cleaning challenge. One-piece silicone construction avoids this entirely.
Avoid rubber spatulas (actual rubber, not silicone). Traditional rubber degrades with heat exposure, absorbs odors permanently, and can impart off-flavors to delicate batters. Silicone has completely replaced rubber for good reason.
What to avoid: Two-piece construction with a removable head. Spatulas rated below 400°F if you’ll use them on the stovetop. Spatulas with sharp edges on the head (they should be rounded and smooth). Spatulas that smell strongly of chemicals when new — this indicates low-grade silicone that may leach compounds when heated. Off-gas any new silicone spatula by baking it empty at 400°F for an hour before first food use.
Price range: $8-14 for a quality one-piece silicone spatula. $15-25 for a set of two or three sizes. $5-8 for acceptable budget options that are still one-piece construction. Below $4, you’re likely getting two-piece construction or low-grade silicone with poor heat resistance.
Care: Dishwasher safe. Silicone is remarkably easy to clean — most food releases with warm water alone. For stubborn stains (tomato sauce, turmeric), soak in a baking soda paste for 30 minutes. Replace when the silicone develops cuts, tears, or permanent deformation that prevents effective scraping.
12. Wooden Spoon
A wooden spoon is the oldest mixing tool in existence and still earns its place in a modern baking kitchen. Wood doesn’t conduct heat (comfortable for stirring hot mixtures), doesn’t scratch any surface (safe in non-stick, enamel, and stainless cookware), and provides a sturdy, rigid stirring action that flexible spatulas can’t match.
For baking specifically, wooden spoons excel at creaming butter and sugar by hand, stirring thick cookie dough that would bend a spatula, and mixing stiff batters where you need force rather than finesse.
What to look for: Hardwood construction — beech, maple, olive wood, or cherry. These dense woods resist splintering, don’t absorb flavors as readily as softwoods, and maintain smooth surfaces for years. A comfortable handle length of 12-14 inches that keeps your hand away from hot pot edges. A head shape suited to your primary use: flat-edged for scraping pan bottoms, rounded for stirring in bowls, pointed corner for reaching into pot edges.
Materials and construction: The grain should run lengthwise along the spoon (from handle tip through the bowl). Cross-grain construction is weaker and more prone to snapping under stress. The surface should be sanded smooth with no rough patches or visible splinters. The wood should be a single piece — laminated or glued wooden spoons can separate at the joint when exposed to repeated water and heat cycles.
Olive wood is the premium choice: extremely dense, naturally antibacterial, beautiful grain patterns, and nearly impervious to water absorption. It’s also the most expensive. Beech is the professional kitchen standard: affordable, hard, smooth-grained, and widely available. Maple is similar to beech in performance. Bamboo (technically a grass, not wood) is sustainable and hard but can splinter along its fibrous grain if not carefully manufactured.
What to avoid: Softwood spoons (pine, poplar) that splinter and absorb everything. Painted or lacquered spoons where the coating chips into food over time. Spoons with rough surfaces that haven’t been properly sanded. Spoons that feel lightweight for their size — this indicates low-density wood that absorbs water and warps.
Price range: $3-8 for a quality beech or maple spoon. $10-20 for olive wood. $15-30 for a set of three different shapes. Wooden spoons are inexpensive enough that quality should never be compromised — spend the extra $2-3 for hardwood over softwood.
Care: Hand wash only — dishwashers strip natural oils and cause cracking. Dry immediately after washing. Periodically condition with food-grade mineral oil (not olive oil or vegetable oil, which go rancid) to prevent drying and cracking. Replace when the surface becomes rough, splintered, or deeply stained in ways that suggest bacterial penetration into the wood grain.
13. Bench Scraper
A bench scraper (also called a dough scraper or pastry scraper) is a flat rectangular blade with a handle along one edge. It’s one of those tools that seems unnecessary until you use one, and then you wonder how you ever baked without it.
Primary uses in baking: dividing bread dough into portions without tearing. Scraping stuck dough off your work surface. Lifting and transferring rolled pastry dough. Cleaning your work surface of flour and dough scraps. Scooping chopped ingredients off a cutting board into a bowl. Cutting butter into flour for pie crust (alternative to a pastry blender).
What to look for: A blade approximately 6 inches wide and 3-4 inches tall. A straight, sharp bottom edge (not rounded) for clean cuts through dough and effective surface scraping. A comfortable handle that provides good grip when pressing down through stiff dough. Enough rigidity to scrape effectively but not so thick that it feels clumsy.
Materials and construction: Stainless steel blade with a polypropylene, wood, or stainless steel handle. The blade should be one piece of steel — no welds, no joints, no rivets in the blade surface. Any irregularity in the blade surface catches dough and makes cleaning difficult.
The blade edge should be straight and smooth. Run your finger along it — it should feel uniformly flat with no burrs or waves. A warped blade doesn’t scrape surfaces cleanly.
Handle attachment: the handle should be permanently fixed to the blade. Riveted handles are strongest. Molded plastic handles that grip the blade edge work well too. Avoid handles attached with adhesive — they separate with use and moisture exposure.
Some bench scrapers are entirely plastic (polypropylene). These are lighter, cheaper, and have a slight flexibility that’s useful for scraping curved bowl surfaces. They’re a complement to a metal bench scraper, not a replacement — plastic can’t cut through stiff dough or scrape hardened flour off a counter as effectively as steel.
What to avoid: Blades with sharp corners that could cut you during use (corners should be slightly rounded for safety). Blades thinner than 1mm that flex too much under pressure. Handles that are too small for comfortable grip. Decorative bench scrapers with engraved blade surfaces that trap dough.
Price range: $6-12 for a quality stainless steel bench scraper. $3-5 for a plastic bowl scraper. $10-18 for a set including both metal and plastic versions. This is an inexpensive tool where quality differences are small — even budget options work adequately if the blade is straight and the handle is secure.
Care: Wash immediately after use — dough dries into concrete on metal surfaces. Dishwasher safe for stainless steel. Dry immediately to prevent water spots. The blade edge will dull slightly over years of scraping against stone or wood surfaces, but bench scrapers aren’t meant to be razor-sharp — a slightly dulled edge still cuts dough and scrapes surfaces effectively.
Preparation Tools
Between measuring and mixing lies preparation — the rolling, cutting, sifting, brushing, and shaping that transforms raw ingredients and dough into forms ready for the oven. These tools handle the physical manipulation that gives baked goods their final shape and texture.
14. Rolling Pin
A rolling pin flattens dough to uniform thickness for pie crusts, cookies, pastry, pasta, and flatbreads. The right rolling pin gives you control over thickness and evenness. The wrong one fights you — sticking to dough, rolling unevenly, or requiring excessive force that overworks delicate pastry.
Types and their purposes:
French rolling pin (tapered, no handles): A solid cylinder that tapers at both ends. You roll with your palms directly on the pin surface, giving maximum tactile feedback about dough thickness and texture. Preferred by pastry chefs for pie dough, puff pastry, and any application requiring sensitivity and control. The taper lets you apply more pressure to one side for shaping.
American rolling pin (handled): A cylinder that spins on an axle between two handles. You grip the handles and push. Less tactile feedback but easier on the wrists for extended rolling sessions. The spinning barrel reduces friction. Good for cookie dough, bread dough, and applications where you’re rolling large quantities.
What to look for: Length of at least 15 inches (barrel length for handled pins, total length for French pins) to roll dough wider than a pie plate without running off the edge. Smooth, non-porous surface that releases dough cleanly. Enough weight to flatten dough without excessive downward pressure from you — heavier pins do more work with less effort. Uniform diameter along the barrel (for American style) — any taper creates uneven dough thickness.
Materials and construction: Wood is traditional and effective. Hardwoods (maple, beech, cherry) provide good weight, smooth surfaces, and don’t absorb moisture readily when properly finished. The surface should be sanded to a very fine finish (220+ grit) without any lacquer or varnish that could chip into food. Unfinished hardwood develops a natural patina with use that becomes increasingly non-stick over time.
Marble rolling pins are heavy (which reduces effort) and naturally cold (which keeps butter-based pastry dough chilled during rolling). They’re excellent for puff pastry and pie dough where keeping butter cold is critical. Downsides: they’re breakable, expensive, and the cold surface can make some doughs too stiff.
Stainless steel rolling pins can be chilled in the freezer and offer a perfectly smooth, non-porous surface. They’re hygienic and easy to clean. But they’re expensive and the smooth surface can be too slippery for some doughs.
Silicone rolling pins have a non-stick surface that works well with sticky doughs. They’re easy to clean and don’t require flouring. But they’re lightweight (requiring more effort from you) and the silicone surface can drag on delicate pastry.
What to avoid: Rolling pins with rough surfaces or visible grain that imprints into dough. Pins with loose handles that wobble (for American style). Pins that are too light (under 1 pound) — you’ll compensate with arm pressure, which overworks the dough and fatigues you. Pins with lacquer or polyurethane finish that chips over time.
Price range: $10-20 for a quality hardwood French pin. $15-30 for a handled American pin with ball bearings. $25-50 for marble. $30-60 for stainless steel. A $12-15 maple French rolling pin is honestly all most bakers need. It’s the tool professional pastry chefs use daily, and it costs less than most specialty gadgets.
Care: Wood pins should never be submerged in water or put in a dishwasher — they’ll warp and crack. Wipe clean with a damp cloth immediately after use. Scrape off stuck dough with a bench scraper. If dough residue dries on, dampen a cloth and lay it over the pin for 10 minutes to soften, then wipe clean. Condition wood pins with food-grade mineral oil once or twice a year. Store horizontally — standing a pin on end can cause warping over time.
15. Pastry Blender
A pastry blender (also called a pastry cutter) cuts cold butter or shortening into flour to create the flaky layers in pie crust, biscuits, and scones. The goal is pea-sized pieces of fat distributed throughout the flour — not fully incorporated, not left in large chunks. This specific texture is nearly impossible to achieve as efficiently with any other tool.
What to look for: Five or six curved stainless steel blades (wires or flat blades) attached to a handle in a U-shape. The blades should be rigid enough to cut through cold butter without bending but thin enough to create clean cuts rather than smashing. A comfortable handle that fits your palm — you’ll be pressing down repeatedly with significant force. Handle width of at least 4 inches for comfortable grip distribution.
Materials and construction: Blades should be stainless steel, either wire (round cross-section) or flat blade (rectangular cross-section). Wire-style blades cut butter more cleanly and are easier to clean because dough doesn’t stick between them as readily. Flat blade styles are sturdier and don’t bend as easily but trap butter between blades during use.
The handle should be sturdy enough to withstand repeated downward force without cracking. Stainless steel handles are strongest but can be uncomfortable without padding. Wood handles are comfortable but can loosen from the blade assembly over time. Rubberized or silicone-coated handles offer the best combination of comfort and durability.
The blade-to-handle connection is the failure point on most pastry blenders. Blades should be welded or mechanically fastened to the handle bracket, not simply pressed in. Pull on the blades before buying — if they flex away from the handle, they’ll eventually pull free during use.
What to avoid: Pastry blenders with fewer than 4 blades (insufficient cutting action). Blades that are too close together (butter gets trapped between them and won’t release). Handles that are too narrow (concentrates force on a small area of your palm, causing discomfort). Plastic blades that flex under pressure and can’t cut through cold butter effectively.
Price range: $8-15 for a quality pastry blender. $15-25 for professional-grade with ergonomic handle and heavy-gauge wire blades. This is a simple tool — the price difference between adequate and excellent is small. Spend $10-12 and get something that lasts years.
Care: Wash immediately after use — butter and flour cement between blades if left to dry. A brush helps clean between wires. Dishwasher safe for all-metal construction. Check blade attachment periodically — tighten or replace if blades loosen from the handle.
16. Sifter/Fine Mesh Strainer
Sifting aerates flour, removes lumps from cocoa powder and powdered sugar, and combines dry ingredients more uniformly than stirring alone. A fine mesh strainer serves the same purpose as a traditional rotary sifter while also functioning as a strainer for custards, a duster for powdered sugar on finished desserts, and a tool for rinsing berries.
What to look for: Mesh fineness of 40-60 mesh (wires per inch) for general baking sifting. This catches lumps while allowing fine flour through quickly. A bowl-shaped strainer with a handle and a hook or ear on the opposite side for resting across a bowl. Diameter of 6-8 inches for sifting into standard mixing bowls. A reinforced rim that maintains its circular shape — cheap strainers deform into ovals that don’t sit properly on bowls.
Materials and construction: Stainless steel mesh and frame are essential. The mesh should be woven (not welded at intersections) for flexibility and durability. Welded mesh is stiffer and more prone to breaking at the weld points when you press ingredients through with a spoon. The frame rim should be rolled or folded over the mesh edge — this prevents the mesh from pulling away from the frame during use and eliminates sharp wire ends that could cut you or contaminate food.
The handle should be securely attached — riveted or welded to the frame. Spot-welded handles break under the stress of pressing thick mixtures through the mesh. A hook or flat rest on the opposite side from the handle lets you balance the strainer across a bowl hands-free while you scoop ingredients into it.
Traditional rotary sifters (the squeeze-handle type with a rotating blade inside) work but have significant drawbacks: they’re difficult to clean thoroughly, the mechanism traps flour in crevices, and they only sift — they can’t strain liquids or dust surfaces. A fine mesh strainer does everything a rotary sifter does plus more, with easier cleaning.
What to avoid: Mesh strainers with plastic frames (they warp and crack). Strainers where the mesh isn’t secured to the frame all the way around (gaps let unsifted material through). Strainers with handles that flex or rotate when you press against the mesh. Extremely fine mesh (80+ mesh) that clogs with flour and requires constant tapping.
Price range: $8-15 for a quality 7-inch fine mesh strainer. $15-25 for a set of three sizes (small for dusting, medium for sifting, large for straining). Below $5, frame construction is flimsy and mesh quality is poor — wires break and end up in your food.
Care: Rinse immediately after use — dried flour in mesh is extremely difficult to remove. Use a brush to clean mesh from both sides. Dishwasher safe but hand washing extends mesh life (dishwasher water pressure can deform fine mesh over time). Inspect mesh periodically for broken wires — a strainer with broken mesh wires should be replaced immediately as wire fragments can end up in food.
17. Pastry Brush
A pastry brush applies egg wash to pie crusts, butter to phyllo dough, milk to bread tops, and glaze to pastries. It’s a precision application tool — you want even, controlled coating without excess liquid pooling or dripping.
What to look for: Bristle width of 1.5-2 inches for most baking applications (wider for large surface areas like sheet pan pastries, narrower for detailed work). Bristles that hold liquid without dripping excessively. Bristles soft enough to apply egg wash without tearing delicate dough surfaces. A handle long enough to keep your hand away from hot surfaces when brushing items in the oven.
Materials and construction: Two material choices dominate: natural bristle and silicone.
Natural bristle brushes (boar hair) hold liquid better, apply more evenly, and provide a softer touch on delicate doughs. They’re the professional pastry chef’s choice for egg wash and delicate glazing. Downsides: bristles shed (especially cheap ones), they’re harder to clean thoroughly, they retain odors, and they can’t handle high heat (bristles melt/burn above 400°F).
Silicone bristle brushes are heat resistant (up to 450-500°F), completely non-porous (no odor retention), dishwasher safe, and never shed bristles into your food. They’re hygienic and easy to maintain. Downsides: they don’t hold liquid as well as natural bristles (requiring more frequent dipping), they can drag on delicate surfaces, and the coating they apply is less even than natural bristle.
For baking specifically, I recommend owning both: a natural bristle brush for egg wash and delicate glazing at room temperature, and a silicone brush for applying butter to hot pans and brushing items in or near the oven.
What to avoid: Brushes with bristles that shed on first use (pull a few bristles before buying — they should resist firmly). Brushes with painted or varnished handles that chip into food. Brushes with metal ferrules (the band holding bristles to the handle) that rust. Silicone brushes with bristles too thick and widely spaced to hold adequate liquid.
Price range: $4-8 for a quality natural bristle pastry brush. $6-12 for a quality silicone brush. $10-18 for a set including both types. Pastry brushes are inexpensive — replace them when bristles become sparse, stiff, or permanently stained.
Care: Natural bristle: wash with warm soapy water immediately after use. Reshape bristles while wet and dry hanging with bristles down. Never put in dishwasher. Replace every 6-12 months with regular use. Silicone: dishwasher safe. Virtually no maintenance required. Replace when bristles develop tears or permanent deformation.
18. Zester/Microplane
A zester (specifically a rasp-style grater like a Microplane) removes the flavorful outer layer of citrus peel in fine shreds without reaching the bitter white pith beneath. In baking, citrus zest adds intense flavor to cakes, cookies, frostings, and curds without adding liquid. A Microplane also grates whole nutmeg, fresh ginger, hard chocolate, and Parmesan cheese into fine particles.
What to look for: Razor-sharp etched teeth (not stamped or punched) that cut cleanly rather than tearing. A long grating surface (at least 8 inches) for efficient strokes. A comfortable handle with a non-slip grip. A protective cover for safe storage (those teeth are genuinely sharp). Teeth that face one direction for consistent grating with a single stroke direction.
Materials and construction: The grating surface should be acid-etched stainless steel. Acid etching creates teeth with sharp cutting edges on one side and a smooth back — this is what makes the tool cut rather than tear. Stamped or punched holes (like a traditional box grater) tear food rather than cutting it, producing less flavor extraction and more bitter pith inclusion.
The steel should be hardened sufficiently to maintain sharpness through years of use. Surgical-grade stainless steel (400 series) holds an edge longer than softer 300 series stainless. You can’t easily test this in a store, but brand reputation and price point are reasonable indicators — established brands use appropriate steel grades.
The handle should be ergonomic and non-slip. You’re applying forward pressure while gripping — a slippery handle is a safety hazard given how sharp the teeth are. Rubberized or soft-touch handle coatings provide the best grip security.
What to avoid: Zesters with dull teeth that require excessive pressure (this pushes through to the bitter pith). Zesters without a handle (holding the bare metal frame is uncomfortable and unsafe). Zesters with teeth facing multiple directions (inconsistent results, harder to clean). Zesters made from thin, flexible metal that bows under pressure.
Price range: $12-18 for a quality rasp-style zester. $20-35 for premium brands with ergonomic handles and protective covers. Below $8, tooth sharpness and steel quality drop noticeably — you’ll press harder, get less zest, and include more pith. A $14-16 zester from a reputable brand lasts 5-10 years of regular use before teeth dull enough to warrant replacement.
Care: Hand wash only — dishwasher detergent and water pressure can dull the teeth over time. Clean immediately after use by running water over the back (smooth side) while brushing the toothed side with a cleaning brush. Dry immediately to prevent any corrosion. Store with the protective cover on to prevent tooth damage and accidental cuts.
19. Pastry Wheel
A pastry wheel (also called a pastry cutter or pizza wheel in larger sizes) cuts rolled dough cleanly without dragging or distorting it. Use it for cutting lattice strips for pie tops, trimming pie dough edges, cutting crackers and flatbreads into shapes, portioning pasta dough, and cutting bar cookies into even pieces.
What to look for: A sharp circular blade that rotates freely on its axle. Blade diameter of 2.5-3 inches for pastry work (larger wheels are for pizza). A straight cutting edge for clean lines, or a fluted/crimped edge for decorative cuts (ideally own both). A comfortable handle that keeps your fingers away from the blade. Smooth rotation without wobble — a wobbly blade cuts unevenly.
Materials and construction: Blade should be stainless steel, sharp enough to cut through multiple layers of dough without excessive pressure. The axle should be a proper bearing or bushing — not just a rivet that the blade rattles around on. Smooth rotation means less force required, which means less dough distortion during cutting.
Handle materials vary: stainless steel, wood, or plastic. All work adequately. The key is comfortable grip and sufficient distance between your fingers and the blade. Some designs integrate a finger guard — useful for safety but can limit visibility of your cut line.
What to avoid: Wheels with dull blades that crush rather than cut dough. Wheels where the blade doesn’t spin freely (you end up dragging rather than rolling). Wheels without a guard or adequate finger clearance. Wheels with blades that can’t be removed for cleaning — dough accumulates around the axle and becomes unsanitary.
Price range: $6-12 for a quality pastry wheel. $10-18 for a set with both straight and fluted blades. Simple tool, modest price. Sharpness and smooth rotation are the only qualities that matter — test before buying if possible.
Care: Disassemble (if possible) and clean around the axle after each use. Dough and flour pack into the axle area and harden. Dry thoroughly to prevent rust around the bearing. The blade will dull over time — some wheels have replaceable blades, others need to be replaced entirely when cutting performance degrades.
20. Cookie Cutters
Cookie cutters stamp shapes from rolled dough. Beyond cookies, they shape biscuits, cut fondant decorations, portion scones, and create uniform pastry shapes. A basic set of geometric shapes (circles, squares, stars) plus a few seasonal or decorative shapes covers most baking needs.
What to look for: Sharp cutting edges that press cleanly through dough without requiring excessive force. Comfortable top edges (rolled or padded) that don’t hurt your palm when pressing down. Depth of at least 1 inch for standard cookie thickness. Shapes with clean lines and no rough spots that tear dough. Nesting sets that store compactly.
Materials and construction: Stainless steel is the professional standard. It’s sharp, durable, rust-resistant, and maintains its shape through thousands of uses. The steel should be thin enough to cut cleanly (0.3-0.5mm) but rigid enough to maintain shape when pressed through stiff dough. The top edge should be rolled or folded for comfortable hand pressure.
Tinplate (tin-coated steel) is the traditional material — cheaper than stainless but prone to rust if not dried immediately after washing. Tinplate cutters work fine if you’re diligent about drying. They’ll last years with proper care or months without it.
Copper cookie cutters are premium — they hold shape perfectly, cut cleanly, and develop a beautiful patina over time. They’re also 3-5 times the price of stainless steel with no functional advantage for most bakers. They make lovely display pieces and gifts but aren’t necessary for excellent results.
Plastic cookie cutters are the budget option. They work for soft doughs but lack the cutting edge sharpness of metal. They compress dough edges rather than cutting cleanly, which can affect how cookies rise and spread during baking. Plastic also warps over time, especially if stored in warm environments or washed in hot water.
What to avoid: Cutters with rough or sharp top edges that hurt your hand when pressing. Cutters with intricate details so fine that dough sticks in the crevices and the shape doesn’t release cleanly. Cutters made from thin metal that bends out of shape with normal use. Painted or coated cutters where the coating chips into food.
Price range: $8-15 for a basic set of 12 geometric shapes in stainless steel. $15-30 for themed sets or larger collections. $3-6 for individual specialty shapes. Individual copper cutters run $5-12 each. Cookie cutters are inexpensive enough to accumulate over time — start with basic circles and squares, add specialty shapes as needed.
Care: Wash and dry immediately after use — this is critical for tinplate cutters that rust quickly. Stainless steel is more forgiving but still benefits from prompt drying. Store in a dry location. If cutters develop rust spots (tinplate), scrub with fine steel wool and dry thoroughly. Replace if rust has pitted the cutting edge — pitted edges tear dough rather than cutting it.
Baking Pans and Sheets
Pans are where chemistry becomes physics. The material, thickness, color, and finish of your baking pans determine how heat transfers to your batter or dough. A dark thin pan and a light heavy pan in the same oven at the same temperature produce dramatically different results — different browning, different rise, different texture. Understanding pan materials is understanding baking outcomes.
21. Sheet Pan (Half Sheet)
A half sheet pan (18 x 13 inches) is the workhorse of any baking kitchen. Cookies, roasted vegetables, sheet cakes, meringues, granola, toasted nuts — this single pan handles more tasks than any other piece of baking equipment you own.
What to look for: True half-sheet size (18 x 13 inches with a 1-inch rim). Heavy gauge aluminum that doesn’t warp when heated. A rolled rim that adds structural rigidity and provides a grip edge. Flat bottom without warping — hold the pan at eye level and look across the surface for any bowing. Light-colored surface for even browning without over-darkening bottoms.
Materials and construction: Aluminum is the correct material for sheet pans. It conducts heat evenly and efficiently, it’s lightweight enough to handle easily even when loaded with food, and it’s affordable enough to own multiple pans. Commercial-grade aluminum sheet pans use 18-gauge aluminum (about 1.2mm thick) — this thickness resists warping that thinner pans suffer from.
The gauge number is critical. 18-gauge is commercial standard and resists warping. 20-gauge is acceptable for home use but may warp over time with high-heat roasting. 22-gauge and thinner will warp almost immediately and should be avoided.
Aluminized steel is an alternative — steel coated with aluminum. It’s slightly heavier and more warp-resistant than pure aluminum but doesn’t conduct heat quite as evenly. It’s a reasonable choice if warping is your primary concern.
What about non-stick coating? For sheet pans, non-stick coating is unnecessary and counterproductive. Parchment paper or silicone mats provide non-stick properties without degrading over time. Non-stick coatings on sheet pans scratch from spatulas and utensils, flake into food, and darken the pan surface (causing over-browning). Buy uncoated aluminum and use parchment.
What about dark/non-stick sheet pans? Dark surfaces absorb more radiant heat, causing faster and darker browning on the bottom of whatever you’re baking. This is usually undesirable — cookie bottoms burn before centers set, cake layers brown unevenly. Light-colored aluminum gives you the most control over browning.
What to avoid: Thin-gauge pans that warp (the “oil-canning” pop when heated). Dark-colored pans for general baking. Pans without a rim (rimless “cookie sheets” let items slide off and don’t contain liquid from juicy roasted items). Pans with non-stick coating that will inevitably scratch and flake. Insulated/air-cushion pans that prevent proper browning on cookie bottoms.
Price range: $10-15 each for commercial-grade 18-gauge aluminum half sheet pans. Buy at least two — you’ll often need both simultaneously. $20-30 for premium brands with reinforced rims. Restaurant supply stores sell commercial sheet pans for $8-12 each — these are identical to what professional bakeries use and represent the best value. Below $7, you’re getting thin gauge aluminum that warps.
Care: Hand wash with non-abrasive sponge. Aluminum darkens naturally with use — this is normal oxidation that doesn’t affect performance. Don’t use steel wool or abrasive cleaners that scratch the surface. For stuck-on food, soak in warm soapy water for 30 minutes. Baking soda paste removes stubborn stains. Never put aluminum pans in the dishwasher — alkaline dishwasher detergent causes pitting and discoloration.
22. Round Cake Pans
Round cake pans produce layer cakes, the foundation of birthday cakes, wedding cakes, and most celebration cakes. You need at least two identical pans to make a basic two-layer cake without baking sequentially in a single pan (which creates timing and texture inconsistencies between layers).
What to look for: 8-inch or 9-inch diameter (9-inch is more versatile for standard recipes). Straight sides at least 2 inches tall (3 inches for deep cakes). Flat, perfectly level bottom. Light-colored surface. Identical dimensions if buying a pair — layers must match in diameter and height for even stacking.
Materials and construction: Light-colored aluminum is the professional standard for cake pans. Same reasoning as sheet pans: even heat distribution, predictable browning, lightweight handling. The gauge should be 18-20 for adequate rigidity and heat distribution.
Anodized aluminum is aluminum treated with an electrochemical process that hardens the surface, making it more scratch-resistant and slightly darker in color. It’s a good choice for cake pans — the hardened surface releases cakes more easily than raw aluminum, and the slight darkening isn’t enough to cause over-browning like dark non-stick pans.
Straight sides vs. sloped sides: Cake pans should have perfectly straight, vertical sides. Sloped sides (like a skillet) create layers that are wider at the bottom than the top, making stacking and frosting difficult. Check by looking at the pan from the side — the wall should be perpendicular to the bottom.
To grease or not: Even with non-stick pans, cake pans should be greased and floured (or lined with parchment) for reliable release. Non-stick coating on cake pans is a convenience, not a necessity. If you grease and line properly, uncoated aluminum releases perfectly. Non-stick coating adds cost and eventually degrades.
What to avoid: Dark-colored pans that over-brown cake edges and bottoms. Pans with sloped sides. Pans with decorative patterns on the bottom (unless you specifically want imprinted designs). Pans thinner than 20-gauge that conduct heat unevenly. Pans with non-removable bottoms that make release difficult for delicate cakes (though for standard butter cakes, fixed bottoms are fine with proper greasing).
Price range: $10-18 each for quality aluminum cake pans. $20-35 for anodized aluminum from premium brands. Buy in pairs of identical pans. $25-40 for a pair represents good value for pans that last 20+ years. Below $8 each, gauge is too thin for even baking.
Care: Hand wash, dry immediately. Grease buildup on the outside of cake pans is normal and doesn’t affect performance — don’t scrub it off aggressively. If cake sticks despite greasing, the pan surface may have developed rough spots — lightly sand with fine sandpaper (400 grit) and re-season with a thin coat of vegetable oil baked at 350°F for an hour.
23. Square/Rectangular Baking Pan
A 9×13-inch rectangular pan and a 9×9-inch or 8×8-inch square pan handle brownies, bar cookies, sheet cakes, casseroles, and bread pudding. These are the everyday workhorses for non-round baking.
What to look for: Sharp 90-degree corners (not rounded) for maximum usable area and even portioning. Straight sides at least 2 inches tall. Flat bottom. Light-colored surface. Handles or grip edges for safe removal from the oven when full of heavy batter.
Materials and construction: Aluminum or aluminized steel for the same heat-distribution reasons as other pans. Glass (Pyrex) is also common for rectangular baking — it retains heat well, allows you to see browning on the bottom, and transitions from oven to table for serving. However, glass conducts heat differently than metal: it heats slowly but retains heat longer, which means items continue baking after removal from the oven. Reduce oven temperature by 25°F when using glass pans with recipes developed for metal.
Ceramic baking dishes are beautiful for serving but have the same heat-retention characteristics as glass — adjust temperature accordingly. They’re also heavy, breakable, and expensive.
For brownies and bar cookies specifically, aluminum is preferred over glass because you want precise control over doneness — the carryover baking in glass can push brownies from fudgy to cakey.
What to avoid: Pans with rounded corners that waste space and make cutting even portions difficult. Dark non-stick pans that over-brown brownie edges. Pans without handles or grip edges (a 9×13 pan full of batter is heavy and slippery). Thin pans that warp under the weight of dense batters.
Price range: $10-18 for quality aluminum rectangular pans. $12-20 for glass. $20-40 for ceramic. For pure baking performance, a $12-15 aluminum 9×13 pan outperforms a $40 ceramic dish. Buy ceramic when presentation matters (oven to table serving).
Care: Same as other aluminum pans — hand wash, avoid dishwasher for aluminum. Glass and ceramic are dishwasher safe. Line with parchment paper for easy brownie/bar cookie removal and minimal cleanup.
24. Muffin/Cupcake Pan
A standard 12-cup muffin pan produces muffins and cupcakes with consistent size and shape. The cup dimensions (approximately 2.75 inches diameter, 1.5 inches deep for standard size) are designed to work with standard paper liners and standard recipe yields.
What to look for: 12-cup capacity (standard). Cups with straight or slightly tapered sides. Flat top surface between cups for structural rigidity. Adequate space between cups for air circulation (cups too close together create uneven baking — outer edges brown while inner-facing sides stay pale). A flat bottom that sits level in the oven.
Materials and construction: Aluminized steel is the most common material for muffin pans and works well. It’s heavier than pure aluminum (providing stability) and more rigid (resisting warping from the repeated heating/cooling cycles muffin pans endure). Light-colored aluminized steel is preferred over dark non-stick for the same browning-control reasons as other pans.
Non-stick coating is more justifiable on muffin pans than on sheet pans because the cup shape makes release more challenging. If you use paper liners (which you should for cupcakes), non-stick coating is irrelevant. For muffins baked directly in the cup without liners, a light non-stick coating helps release. Silicone muffin pans offer easy release without coating but conduct heat poorly, producing pale muffins with less rise.
What to avoid: Pans with cups too close together (less than 0.5 inches between cup edges). Pans that flex when you grip them (structural weakness leads to spilling when transferring to/from oven). Dark-colored pans that over-brown muffin bottoms and sides. Pans with sharp edges between cups that make cleaning difficult.
Price range: $12-20 for a quality 12-cup muffin pan. $18-30 for premium non-stick or commercial-grade. Buy two if you regularly bake full batches (most muffin recipes yield 12-18 muffins). Below $8, the metal is thin, cups are poorly shaped, and the pan warps within months.
Care: Wash promptly — batter that overflows and bakes onto the flat surface between cups is difficult to remove once hardened. Non-stick pans should be washed with non-abrasive sponges only. If baking without liners, grease cups thoroughly before each use regardless of non-stick coating. Paper liners eliminate most cleaning challenges.
25. Loaf Pan
A loaf pan shapes sandwich bread, banana bread, pound cake, and meatloaf into the familiar rectangular loaf form. Standard sizes are 9×5 inches and 8.5×4.5 inches — recipes specify which size, and using the wrong size affects rise height and baking time.
What to look for: Standard dimensions (9×5 or 8.5×4.5 inches). Straight sides with a slight outward taper for easy release. Depth of at least 2.5 inches. Flat bottom. Light-colored surface. Sturdy enough to support heavy bread dough without flexing.
Materials and construction: Light-colored aluminized steel or aluminum. For bread baking specifically, a slightly heavier pan is beneficial — the thermal mass helps create a better crust on the bottom and sides of the loaf. Glass loaf pans work for quick breads (banana bread, zucchini bread) where you want to monitor browning on the sides, but they’re less ideal for yeast breads where consistent heat transfer matters more.
Some premium loaf pans are made from heavy-gauge steel with a Goldtouch or similar light-colored non-stick finish. These combine the thermal mass of steel with the browning control of a light surface — an excellent combination for bread baking.
What to avoid: Dark pans that over-brown bread crusts (especially problematic for sandwich bread where you want a soft, light crust). Pans with inward-sloping sides that trap the loaf and make release difficult. Pans without adequate depth — bread dough that rises above the pan rim mushrooms over the edge and bakes unevenly. Silicone loaf pans that produce pale, soft crusts with poor structure.
Price range: $8-15 for a quality aluminized steel loaf pan. $15-25 for premium heavy-gauge with light non-stick finish. $5-10 for glass. Own at least one of each standard size (9×5 and 8.5×4.5) since recipes specify size and the difference matters.
Care: Same as other metal pans. For bread baking, a thin layer of grease buildup on the pan interior actually improves release over time — don’t scrub it away aggressively. If bread sticks despite greasing, the pan surface may need re-seasoning: coat with vegetable oil and bake empty at 375°F for 45 minutes.
26. Bundt Pan
A Bundt pan creates the distinctive ring-shaped cake with decorative fluted sides. The center tube serves a functional purpose beyond aesthetics — it conducts heat to the center of a thick cake, ensuring the middle bakes through before the outside over-browns. This makes Bundt pans ideal for dense, moist cakes (pound cake, coffee cake, fruit cakes) that would underbake in the center in a standard round pan.
What to look for: 10-12 cup capacity (standard). Intricate but not overly complex design — extremely detailed patterns trap cake and make release difficult. A wide center tube for effective heat conduction. Heavy construction that distributes heat evenly across the decorative surface. Non-stick coating is nearly essential for Bundt pans due to the complex shape — releasing an uncoated Bundt cake without damage requires expert-level greasing technique.
Materials and construction: Cast aluminum is the traditional and best material for Bundt pans. It’s heavy enough to provide even heat distribution across the complex surface geometry, and it can be cast into intricate shapes that would be impossible with stamped sheet metal. The casting should be smooth with no rough spots or pitting that would trap cake.
Non-stick coating quality matters enormously for Bundt pans. A quality non-stick coating (multiple layers, properly cured) releases cake cleanly from intricate designs. A cheap single-layer coating fails within a few uses, leaving you with a decorative pan that destroys every cake you bake in it. This is one pan category where investing in a premium brand with proven non-stick performance is genuinely worth the price difference.
What to avoid: Pans with extremely intricate designs if you’re a beginner (start with classic fluted designs and work up to cathedral or rose patterns). Pans with thin walls that create hot spots on decorative peaks. Pans without non-stick coating (unless you’re an experienced baker with excellent pan-preparation technique). Pans with rough interior surfaces from poor casting quality.
Price range: $25-40 for a quality cast aluminum Bundt pan with reliable non-stick. $40-70 for premium brands with intricate designs and superior non-stick coatings. Below $15, casting quality and non-stick performance are unreliable. A Bundt pan is one tool where the premium price genuinely correlates with better results — the $35-45 range from established brands produces consistent, beautiful cakes.
Care: Hand wash only with soft sponge — never use abrasive cleaners or metal utensils that scratch non-stick coating. Dry immediately and thoroughly — water trapped in decorative crevices causes coating degradation. Grease thoroughly before each use even with non-stick coating (use butter and flour, or a baking spray with flour included). Store carefully — don’t stack heavy items inside that could scratch the coating.
27. Springform Pan
A springform pan has a removable bottom and a side wall secured by a spring-loaded clamp. Releasing the clamp loosens the side wall, which lifts away from the cake without requiring you to flip the pan upside down. This is essential for delicate cakes that would break if inverted — cheesecake, mousse cakes, tortes with fragile toppings, and ice cream cakes.
What to look for: 9-inch or 10-inch diameter (9-inch is standard for most cheesecake recipes). Tight seal between the bottom and side wall — any gap leaks liquid batter during baking. A clamp mechanism that locks securely and releases smoothly. Flat, warp-free bottom. Side wall height of at least 2.5 inches (3 inches preferred for tall cheesecakes).
Materials and construction: Tinplate steel or aluminized steel with non-stick coating. The critical quality factor is the seal between the bottom disk and the side wall. On quality springform pans, the bottom disk has a raised lip that the side wall presses against, creating a tight seal. On cheap pans, the bottom is flat and relies entirely on the clamp pressure to maintain contact — these leak.
Test the seal before buying (or immediately upon receiving): close the clamp and run your finger around the interior junction of bottom and side. You should feel consistent contact all the way around with no gaps. Fill with water to test for leaks if you’re concerned.
Non-stick coating is important on springform pans because you can’t line the sides with parchment as easily as a standard round pan (the removable mechanism complicates lining). The coating must release cheesecake cleanly from the sides when the clamp opens.
What to avoid: Pans with poor bottom-to-side seals that leak (the most common complaint about cheap springform pans). Pans with clamp mechanisms that don’t hold securely (the side wall loosens during baking, distorting the cake shape). Pans with warped bottoms that rock on flat surfaces. Pans without non-stick coating (cheesecake will bond permanently to uncoated metal).
Price range: $15-25 for a quality springform pan with reliable seal. $25-40 for premium brands with superior sealing mechanisms. Below $10, seal quality is unreliable and you’ll likely experience leaking. The $18-25 range from established brands provides reliable performance. If your springform pan leaks, wrap the outside bottom with aluminum foil as a temporary solution, but ultimately replace the pan.
Care: Hand wash carefully — don’t bend the side wall or damage the sealing edge. Dry all components thoroughly before reassembling for storage. Store assembled (clamped closed) to maintain the side wall’s circular shape. If the non-stick coating deteriorates on the bottom disk, replace the entire pan — a damaged bottom surface makes cheesecake release impossible.
28. Pie Dish
A pie dish (or pie plate) holds pie crust and filling during baking. The sloped sides support the crust structure, and the rim provides an edge for decorative crimping. Pie dishes come in standard sizes (9-inch and 9.5-inch diameter are most common) that correspond to recipe yields.
What to look for: 9-inch diameter measured across the inside top edge. Sloped sides approximately 1.25-1.5 inches deep. A flat rim at least 0.5 inches wide for crust crimping. A surface that promotes browning on the bottom crust (the most common pie failure is a soggy bottom crust from insufficient bottom heat).
Materials and construction: Glass (Pyrex) is the most popular and arguably best material for pie dishes. It allows you to see the bottom crust browning through the transparent dish — you know exactly when the bottom is golden rather than guessing. Glass also retains heat well, continuing to crisp the bottom crust after removal from the oven. And glass transitions from oven to table for attractive serving.
Ceramic pie dishes are beautiful and retain heat well but don’t allow bottom-crust visibility. They’re heavier than glass and more expensive. Choose ceramic when presentation is the priority.
Metal pie pans (aluminum or tinplate) conduct heat efficiently and produce excellent bottom-crust browning. They’re the choice of professional pie bakers who prioritize crust quality over presentation. Disposable aluminum pie pans work surprisingly well for baking — the thin aluminum transfers heat quickly to the bottom crust. They’re not durable enough for repeated use but excellent for pies you’re giving away or transporting.
Dark metal pie pans brown the bottom crust fastest but risk over-browning if you’re not attentive. Light metal provides more moderate, controllable browning.
What to avoid: Deep-dish pie plates for standard recipes (the filling-to-crust ratio changes, affecting baking time and structural integrity). Pie dishes with steep rather than sloped sides (crust slides down steep sides during blind baking). Dishes without a flat rim (no surface for crimping). Non-stick pie dishes (crust doesn’t need non-stick — it has enough butter/fat to release naturally, and non-stick coating prevents the crust from gripping the sides during baking, causing slumping).
Price range: $6-12 for quality glass pie dishes. $15-35 for ceramic. $8-15 for metal. Glass represents the best value for most home bakers — a $8 Pyrex pie dish performs identically to a $30 ceramic dish in terms of baking results, with the added advantage of bottom visibility.
Care: Glass and ceramic are dishwasher safe. Metal should be hand washed and dried immediately. Glass pie dishes can shatter from thermal shock — don’t place a hot dish on a cold wet surface or put a cold dish into a preheated oven. Let glass transition temperatures gradually.
29. Tart Pan
A tart pan produces the elegant, shallow pastry shells with fluted edges and removable bottoms that define French-style tarts. The removable bottom lets you unmold the tart for freestanding presentation — the fluted pastry shell stands on its own without the pan.
What to look for: 9-inch or 11-inch diameter (9-inch for individual dessert tarts, 11-inch for full-size). Removable bottom that lifts out cleanly. Fluted sides approximately 1 inch tall. Sharp fluting that creates defined ridges in the pastry. A bottom disk that fits snugly without gaps that leak liquid fillings.
Materials and construction: Tinplate steel with a dark or matte finish is traditional and functional. The dark surface promotes rapid browning of the thin tart shell — important because tart pastry is thin and needs to crisp quickly before the filling makes it soggy. Unlike cake pans where dark color is problematic, dark tart pans are actually preferred.
Non-stick coating is helpful but not essential — properly made tart dough (high butter content) releases from uncoated metal readily. If your tart dough sticks, the issue is usually the dough recipe (not enough fat) rather than the pan surface.
The fluting should be sharp and well-defined. Rounded, soft fluting produces tarts that look homemade rather than professional. Sharp fluting requires quality stamping dies during manufacturing — it’s a reliable indicator of overall pan quality.
What to avoid: Pans without removable bottoms (you can’t unmold the tart without destroying it). Pans with shallow, rounded fluting that doesn’t create defined ridges. Pans where the removable bottom fits loosely (filling leaks through gaps). Light-colored pans that don’t brown tart shells adequately.
Price range: $8-15 for a quality tinplate tart pan with removable bottom. $15-25 for non-stick versions. $20-35 for sets including multiple sizes. Tart pans are inexpensive and last for years with basic care. A $10-12 pan from a reputable brand produces professional results.
Care: Hand wash and dry immediately — tinplate rusts quickly if left wet. Don’t use abrasive cleaners that remove the dark finish. Store in a dry location. If rust develops, scrub with fine steel wool, wash, dry thoroughly, and lightly oil the surface. The removable bottom should be stored inside the ring to maintain fit.
30. Cooling Rack
A cooling rack elevates baked goods above the counter surface, allowing air to circulate underneath. This prevents the bottom from steaming and becoming soggy as the item cools. Without a rack, the trapped steam between a hot pan and the counter surface condenses back into the baked good, creating a soggy bottom layer.
What to look for: Grid pattern (crosshatch) rather than parallel bars — grid patterns support items of all sizes without small cookies falling through gaps. Wire spacing of no more than 0.5 inches to support small items. Size that fits inside your sheet pan (for oven use as a roasting rack) — a half-sheet-sized cooling rack (approximately 17 x 12 inches) is most versatile. Feet at least 0.5 inches tall for adequate air circulation underneath. Sturdy construction that doesn’t bow under the weight of a heavy cake.
Materials and construction: Chrome-plated steel wire is the standard material. The chrome plating prevents rust and provides a smooth surface that doesn’t stick to baked goods. Wire gauge should be heavy enough to support weight without bowing — 4-6mm diameter wire for the frame, 2-3mm for the grid wires.
Stainless steel racks are premium — no plating to chip or wear off, completely rust-proof, and oven-safe to any temperature. They cost more but last indefinitely.
Non-stick coated racks exist but the coating chips over time (especially when you cut items on the rack) and the dark color can transfer marks to light-colored items like sugar cookies.
What to avoid: Racks with parallel bars only (no crosshatch) — small items fall through or balance precariously. Racks with feet too short for adequate air circulation. Racks that aren’t oven-safe if you plan to use them for oven roasting. Racks with rough welds or sharp wire ends that scratch counters and catch on towels. Racks that rust after a few washes (indicates poor chrome plating quality).
Price range: $10-18 for a quality half-sheet-sized cooling rack. $15-25 for stainless steel. $20-35 for a set of two. Own at least two — you’ll often need both simultaneously when baking multiple batches. Below $7, wire gauge is too thin (racks bow) and chrome plating is poor (rust develops quickly).
Care: Wash with warm soapy water and a brush to clean between grid wires. Dishwasher safe for chrome-plated and stainless steel. Dry thoroughly to prevent rust on chrome-plated versions. If chrome plating chips or rust develops, replace the rack — rust flakes contaminate food and chipped plating creates rough spots that stick to baked goods.
Decorating and Finishing Tools
Decorating transforms a baked cake into a finished creation. These tools handle frosting application, smoothing, piping, and the detail work that makes baked goods visually appealing. You don’t need professional pastry chef equipment to produce attractive results — a few well-chosen tools cover most home decorating needs.
31. Piping Bags and Tips
Piping bags fitted with metal tips create decorative borders, rosettes, writing, flowers, and detailed frosting work on cakes and cupcakes. The bag holds frosting under pressure while the tip shapes it into specific patterns as you squeeze.
What to look for: Reusable bags made from polyurethane-coated fabric or silicone in 12-inch and 16-inch sizes (12-inch for detail work, 16-inch for filling and large decorations). A starter set of tips including: round tips (sizes 2, 4, 8, 12) for writing and dots, star tips (sizes 16, 21, 32) for borders and rosettes, petal tip (size 104) for flowers, leaf tip (size 352) for leaves, and a large round tip (size 1A or 2A) for cupcake swirls. A coupler set that lets you change tips without emptying the bag.
Materials and construction: Tips should be seamless stainless steel or nickel-plated brass. Seamless construction means the tip is formed from a single piece of metal with no seam running up the side. Seamed tips (made from a flat piece of metal rolled into a cone and soldered) have a ridge that creates a visible line in your piping and can catch frosting, creating inconsistent flow.
The tip opening should be cleanly cut with no burrs or rough edges that distort the frosting pattern. Hold tips up to light and look through the opening — it should be perfectly symmetrical.
Reusable piping bags should be flexible enough to squeeze comfortably but sturdy enough to withstand pressure without bursting at the seam. Polyurethane-coated fabric bags are the professional standard — they’re flexible, strong, easy to clean, and provide good grip. Silicone bags are easier to clean but stiffer and less comfortable for extended decorating sessions.
Couplers (the two-piece plastic connector that holds tips on the bag) should thread smoothly and grip tips securely. Loose couplers let tips pop off under pressure, creating frosting disasters.
What to avoid: Tips with visible seams. Tips with rough openings. Bags that are too stiff to squeeze comfortably. Bags with weak seams that burst under pressure. Cheap coupler sets where the threading strips after a few uses. Complete “100-piece decorating sets” that include dozens of tips you’ll never use — buy a quality starter set and add individual tips as your skills develop.
Price range: $15-25 for a quality starter set (2 bags, coupler, 6-8 essential tips). $5-10 for individual specialty tips. $8-12 for a quality reusable piping bag. $30-50 for comprehensive sets with 12+ tips and multiple bags. Professional-grade seamless tips cost $2-4 each individually — building a custom collection of exactly the tips you use is more economical than buying large sets with unused pieces.
Care: Wash bags inside-out immediately after use — dried frosting inside a piping bag is extremely difficult to remove and becomes unsanitary. Boil tips in water for 5 minutes to remove all frosting residue from inside the cone. Dry tips thoroughly to prevent rust (nickel-plated) or water spots (stainless). Store tips in a organized case or container — loose tips in a drawer get damaged and lost.
32. Offset Spatula
An offset spatula (also called a palette knife or icing spatula) has a flat, flexible blade that’s bent at an angle near the handle. This offset angle keeps your hand above the cake surface while the blade works flat against it — essential for smooth frosting application without your knuckles dragging through the icing.
What to look for: Two sizes: a large offset spatula (blade 8-10 inches long) for frosting cake tops and sides, and a small offset spatula (blade 4-5 inches long) for detail work, spreading batter in pans, and lifting cookies off sheet pans. Blade flexibility that allows smooth spreading without gouging the cake surface. A rounded blade tip that doesn’t tear cake. Comfortable handle that provides control during the repetitive spreading motion.
Materials and construction: Blade should be stainless steel, thin enough for flexibility but thick enough to maintain flatness under spreading pressure. The blade should flex when you press the tip against a surface but spring back to perfectly flat when released — permanent bending indicates steel that’s too soft.
The offset bend should be clean and consistent (not a sharp kink that creates a stress point). The transition from handle to blade should be smooth with no sharp edges that could cut you during vigorous use.
What to avoid: Blades that are too rigid (they gouge cake surfaces rather than gliding over them). Blades that are too flexible (they can’t spread stiff buttercream evenly). Sharp blade edges (offset spatulas should have dull, rounded edges — they’re spreading tools, not cutting tools). Handles that rotate on the blade tang (indicates loose rivets or poor construction).
Price range: $6-12 for a quality offset spatula. $10-18 for a set of large and small. Professional-grade offset spatulas from restaurant supply stores cost $4-8 each and are identical to what bakery professionals use daily. This is an inexpensive tool where quality differences are modest — a $7 offset spatula from a restaurant supply store performs nearly identically to a $20 retail version.
Care: Wash immediately after use — dried frosting on the blade creates bumps that prevent smooth spreading on subsequent uses. Hand wash or dishwasher safe for stainless steel blades with plastic handles. Don’t use as a prying tool or lever — the thin blade bends permanently if used to lift heavy items. Store flat or hanging — don’t store in a drawer where other utensils press against the blade and create bends.
33. Cake Turntable
A cake turntable is a rotating platform that spins your cake while you frost it. Instead of walking around the cake or awkwardly reaching across it, you stand in one position and rotate the cake toward your spatula. This single change transforms frosting from a frustrating struggle into a controlled, smooth process.
What to look for: A platform at least 12 inches in diameter (accommodates up to 10-inch cake layers with room for your spatula to work). Smooth, consistent rotation without wobble or resistance. A non-slip surface on the platform (or a non-slip mat you can place on it) to prevent the cake from sliding during rotation. Adequate height (at least 4-5 inches) to elevate the cake to a comfortable working level. A heavy, stable base that doesn’t tip when you apply lateral pressure with your spatula.
Materials and construction: Cast iron or heavy steel bases provide the weight and stability needed for smooth rotation. The bearing mechanism should be a proper ball bearing or thrust bearing — not just a plastic-on-plastic friction surface. Ball bearings provide smooth, consistent rotation that you can control precisely. Friction surfaces create jerky, unpredictable rotation that translates into uneven frosting.
The platform surface should be flat and level. Place a level on the platform and rotate — it should read level at every position. A tilted platform creates uneven frosting thickness.
Professional turntables have a tilting mechanism that angles the platform toward you for easier access to cake sides. This is a luxury feature — helpful but not essential for home baking.
What to avoid: Lightweight plastic turntables that wobble and slide across the counter when you apply spatula pressure. Turntables with rough rotation (grinding, catching, or inconsistent resistance). Platforms smaller than 12 inches that don’t accommodate standard cake sizes with working room. Turntables without adequate base weight — they tip when you press against the cake edge.
Price range: $20-35 for a quality home turntable with ball bearing rotation. $40-70 for professional-grade cast iron base with tilting mechanism. $10-15 for basic plastic turntables (functional but frustrating — the wobble and inconsistent rotation make smooth frosting difficult). The $25-35 range represents the sweet spot — smooth enough rotation for clean results without professional-level investment.
Care: Keep the bearing mechanism clean — frosting and crumbs that fall into the rotation mechanism cause grinding and inconsistent spin. Wipe the platform after each use. Don’t submerge turntables with internal bearings — water inside the mechanism causes rust and degradation. A damp cloth wipe is sufficient for cleaning.
34. Bench Knife/Cake Smoother
A cake smoother (also called an icing smoother or bench knife when used for cake work) is a flat, rigid panel that you hold against the cake sides while rotating the turntable. The combination of turntable rotation and smoother pressure creates the perfectly flat, smooth frosting surfaces you see on professional cakes.
What to look for: A flat, rigid panel approximately 6 inches tall and 4-5 inches wide. Perfectly straight edges (hold it up to a straight edge or light source to check for warping). Smooth surface without texture that would imprint into frosting. A comfortable top edge or handle for gripping while applying lateral pressure. Enough rigidity to maintain flatness against the cake without flexing.
Materials and construction: Acrylic (clear plastic) smoothers let you see the frosting surface through the tool while you work — helpful for identifying thin spots and air bubbles. Stainless steel smoothers are more rigid and durable but opaque. Food-grade polypropylene is the most common material — affordable, adequately rigid, and easy to clean.
The working edge (the edge that contacts the frosting) must be perfectly straight and smooth. Any irregularity transfers directly to the frosting surface. Run your fingernail along the edge — you should feel zero bumps, nicks, or rough spots.
What to avoid: Smoothers with rounded or beveled working edges (they create rounded cake edges rather than sharp ones). Smoothers that flex under moderate pressure (they can’t maintain a flat surface against the cake). Smoothers with rough surfaces or manufacturing marks that imprint into frosting. Smoothers with sharp corners that gouge frosting when you reposition.
Price range: $4-10 for a quality cake smoother. $8-15 for a set including different sizes and edge profiles (straight, curved for top smoothing). This is one of the least expensive tools in your decorating kit — spend $6-8 for a quality option and it lasts indefinitely.
Care: Wash immediately after use. Inspect the working edge periodically for nicks or damage — any imperfection in the edge creates lines in your frosting. Replace if the edge becomes damaged. Store flat where nothing presses against the working edge.
Bread Baking Tools
Bread baking has specific tool requirements that differ from pastry and cake work. The high hydration doughs, long fermentation times, extreme oven temperatures, and steam requirements of artisan bread demand specialized equipment. These three tools transform home bread baking from adequate to exceptional.
35. Banneton/Proofing Basket
A banneton (proofing basket) holds shaped bread dough during its final rise before baking. The basket supports the dough’s shape while it proofs — without a banneton, high-hydration artisan doughs spread flat rather than rising upward. The basket’s coiled pattern also imprints a distinctive spiral design on the bread’s surface.
What to look for: Size matched to your recipe’s dough weight: 8-inch round for 500g dough (one standard loaf), 10-inch round for 750g-1kg dough, or oval/oblong shapes for batard-style loaves. Natural rattan or cane construction with tight, even coils. Adequate depth to contain dough as it rises (at least 3 inches). A cloth liner (included with many bannetons) for doughs that stick to bare rattan.
Materials and construction: Natural rattan (Indonesian cane) is the traditional and best material. The natural fibers absorb surface moisture from the dough during proofing, creating a drier skin that scores cleanly and develops better crust during baking. The coiled construction provides structural support while allowing air circulation around the dough.
The rattan should be tightly wound with no gaps between coils where dough could push through and stick. The interior surface should be smooth — rough spots or protruding fiber ends tear dough when you turn it out of the basket.
Wood pulp bannetons (pressed wood fiber) are a budget alternative. They’re lighter and cheaper but don’t absorb moisture as effectively as rattan and tend to develop mold more readily in humid environments.
Plastic proofing baskets with perforated surfaces exist for commercial bakeries — they’re dishwasher safe and mold-resistant but don’t provide the moisture absorption or surface pattern of natural rattan.
What to avoid: Bannetons with loose, uneven coils that create gaps. Bannetons with rough interior surfaces. Bannetons that are too small for your dough quantity (dough overflows during proofing). Bannetons without adequate drying between uses (mold develops quickly in damp rattan).
Price range: $12-20 for a quality rattan banneton with cloth liner. $18-30 for a set of two (round and oval). $25-40 for premium bannetons with additional accessories (scoring lame, dough scraper). Below $8, rattan quality is poor — loose coils, rough surfaces, and inconsistent shape.
Care: After each use, tap out excess flour and let the banneton dry completely in open air before storing. Never wash with water — rattan absorbs water and develops mold. If dough sticks, let it dry completely and then brush out with a stiff brush. If mold develops, brush thoroughly and place in a 200°F oven for 30 minutes to kill mold spores. Store in a dry, ventilated location — not sealed in a cabinet where moisture accumulates.
36. Bread Lame
A bread lame (pronounced “lahm”) is a razor blade mounted on a handle, used to score the surface of bread dough just before baking. Scoring controls where the bread expands during oven spring — without scoring, bread tears unpredictably at its weakest points, creating an uncontrolled, often unattractive shape. Proper scoring creates the decorative patterns (ears, wheat stalks, geometric designs) that define artisan bread aesthetics.
What to look for: A handle that provides secure grip and precise control — you’re making quick, decisive cuts through sticky dough surface. A blade mounting system that holds the blade at a slight curve (curved blades create the “ear” — the lifted flap of crust that’s the hallmark of well-scored bread). Replaceable blades (blades dull after 5-10 uses and must be replaced for clean cuts). A protective cover for safe storage.
Materials and construction: The blade should be a standard double-edge razor blade (the same type used in safety razors). These are surgical-sharp, inexpensive, and universally available as replacements. The handle should hold the blade securely without wobble — any blade movement during scoring creates ragged cuts rather than clean ones.
Handle materials vary: wood (traditional, comfortable), stainless steel (durable, easy to clean), or plastic (functional, inexpensive). The handle design matters more than the material — it should feel natural in your hand and allow you to make quick, confident strokes without adjusting your grip.
Some lames hold the blade flat (straight scoring for baguettes and decorative patterns). Others curve the blade slightly (curved scoring for boules and batards where you want an ear). Ideally, own one of each or choose a design that allows both flat and curved blade mounting.
What to avoid: Lames with fixed, non-replaceable blades (they dull and become useless). Lames where the blade wobbles in the mount (inconsistent cuts). Lames without protective covers (exposed razor blades in a kitchen drawer are a safety hazard). Lames with overly complex blade-changing mechanisms that make replacement tedious.
Price range: $8-15 for a quality bread lame with handle and blade supply. $15-25 for premium designs with multiple blade-mounting options. Replacement blades cost $3-8 for a pack of 10-20. The ongoing cost is minimal — a pack of blades lasts months of regular bread baking.
Care: Replace blades when cuts become ragged rather than clean (typically every 5-10 scoring sessions, depending on dough hydration and blade quality). Clean the handle after each use — dough dries on the handle and affects grip. Store with the protective cover on. Never attempt to sharpen used blades — they’re designed to be disposable and resharpening creates an unpredictable edge.
37. Dutch Oven
A Dutch oven (heavy lidded pot) creates the steam environment that artisan bread needs for proper crust development. Professional bakeries inject steam into their ovens during the first minutes of baking — this keeps the bread surface moist long enough for maximum oven spring (rise) and creates the glossy, crackly crust that defines great bread. Home ovens can’t generate adequate steam, but a preheated Dutch oven with its lid on traps the moisture released by the dough itself, creating a miniature steam chamber.
What to look for: Capacity of 5-7 quarts (large enough for a standard round loaf with room for expansion). Heavy construction that retains heat when you open the oven door to load the dough. A lid that seals reasonably well (doesn’t need to be airtight — just enough to trap steam). Oven-safe to at least 450°F including the lid and any handles. A shape that accommodates your bread shape — round for boules, oval for batards.
Materials and construction: Enameled cast iron is the most popular choice. Cast iron’s massive thermal mass means the pot stays hot when you open it to load dough, and the enamel coating prevents the iron from reacting with acidic sourdough. The enamel should be smooth and free of chips — chipped enamel exposes bare iron that rusts and can contaminate food.
Bare (uncoated) cast iron works equally well for bread baking and costs less. The seasoning (polymerized oil layer) provides adequate non-stick properties for bread. However, bare cast iron requires more maintenance and can react with highly acidic doughs.
Ceramic/stoneware Dutch ovens (like clay bakers) work excellently for bread — they retain heat well and the porous surface absorbs some moisture, creating a slightly different crust character. They’re lighter than cast iron but more fragile.
What to avoid: Dutch ovens with plastic handles or knobs that aren’t oven-safe above 400°F (many stock Dutch ovens have phenolic knobs rated only to 375°F — replace with a metal knob before bread baking). Dutch ovens smaller than 4 quarts (bread doesn’t have room to expand). Thin-walled pots that don’t retain adequate heat. Dutch ovens with lids that don’t sit flat (steam escapes through gaps).
Price range: $40-80 for a quality enameled cast iron Dutch oven suitable for bread baking. $80-150 for premium brands. $25-40 for bare cast iron (excellent value for bread baking). $30-50 for ceramic bread bakers designed specifically for this purpose. For bread baking specifically, a $30 bare cast iron Dutch oven produces results identical to a $150 premium enameled version — the bread doesn’t care about the exterior color or brand name.
Care: Enameled cast iron: hand wash with non-abrasive sponge. Don’t use metal utensils that chip the enamel. Thermal shock can crack enamel — don’t put a hot pot under cold water. Bare cast iron: maintain seasoning by oiling lightly after washing. Don’t use soap (controversial — modern soap is fine, but many cast iron enthusiasts disagree). Dry immediately and thoroughly to prevent rust. For bread baking specifically, the pot interior will darken and develop a patina over time — this is normal and doesn’t affect bread quality.
Specialty and Support Tools
These final tools don’t fit neatly into the categories above but earn their place in a complete baking toolkit through frequent use and practical necessity.
38. Parchment Paper and Silicone Mats
Parchment paper and silicone baking mats serve the same primary purpose: creating a non-stick surface between your baked goods and the pan. They eliminate the need for greasing in most applications, make cleanup effortless, and prevent delicate items (cookies, meringues, tuiles) from bonding permanently to the pan surface.
Parchment paper: Cellulose paper coated with silicone on both sides. Heat resistant to 420-450°F (varies by brand — check the box). Single-use and disposable. Conforms to any pan shape. Can be used for wrapping, lining, and creating piping cones. Available in sheets (pre-cut to half-sheet pan size) or rolls.
Silicone baking mats: Fiberglass mesh coated in food-grade silicone. Reusable for thousands of baking cycles. Heat resistant to 480°F typically. Provides a perfectly flat, non-stick surface. Available in sizes matched to standard pan dimensions.
When to use parchment: Lining cake pans (cut to fit the bottom). Lining loaf pans with overhang for easy lifting. Any application where you need to wrap or fold the liner. When you want to slide items off the liner (transferring cookies to a cooling rack by sliding the parchment sheet). When baking above 450°F (some silicone mats degrade at extreme temperatures).
When to use silicone mats: Cookie baking (consistent results, batch after batch). Candy making (sugar doesn’t stick). Rolling sticky doughs (the mat surface prevents sticking without flour). Any application where you’re baking at moderate temperatures repeatedly and want to eliminate paper waste.
Materials and construction: For parchment paper, look for genuine silicone-coated parchment, not wax paper (which melts and smokes at oven temperatures) or uncoated parchment (which sticks). The silicone coating should be on both sides — single-sided parchment requires you to identify the coated side, which is annoying and error-prone.
For silicone mats, the fiberglass reinforcement mesh should be completely encapsulated in silicone with no exposed fibers. The mat should lie flat without curling at the edges. The silicone should feel smooth and slightly tacky — not slippery (slippery indicates degraded or low-grade silicone). Food-grade certification (FDA-compliant in the US) is essential.
What to avoid: Wax paper used as a parchment substitute (it’s not heat-safe). Silicone mats with visible fiberglass fibers at the edges (contamination risk). Mats that smell strongly of chemicals (off-gas by baking empty at 400°F before first food use). Mats that are too large for your pans (edges fold up and interfere with baking). Parchment paper without silicone coating (it sticks).
Price range: Parchment paper: $4-8 for a roll (75-100 square feet), $6-12 for pre-cut sheets (100-200 sheets). Silicone mats: $10-18 each, $15-25 for a set of two. The per-use cost of silicone mats drops to nearly zero over their lifespan (2000+ uses), making them more economical than parchment for frequent bakers despite the higher upfront cost.
Care: Parchment paper: single use, dispose after baking. Silicone mats: wash with warm soapy water and lay flat to dry. Don’t fold mats for storage (creates permanent creases) — roll loosely or store flat. Don’t cut on silicone mats (knife cuts damage the surface and expose fiberglass). Replace mats when the surface becomes sticky, discolored, or develops visible damage to the silicone coating.
39. Pastry Bags (Disposable)
Disposable piping bags complement reusable bags for tasks where cleanup would be impractical or where you’re working with multiple colors/flavors simultaneously. Filling cannoli, piping choux pastry, filling doughnuts, and working with multiple frosting colors all benefit from disposable bags that you use once and discard.
What to look for: Clear or translucent material that lets you see the contents and fill level. Adequate thickness that doesn’t burst under pressure but thin enough to feel the contents and control flow. Size of 12 inches for detail work, 16-18 inches for filling and large-volume piping. Textured exterior grip surface that prevents the bag from slipping in greasy hands. A pointed tip that can be cut to various opening sizes.
Materials and construction: Polyethylene (plastic film) is the standard material. The film should be thick enough to resist bursting (at least 2 mil thickness) but thin enough to be comfortable and controllable. Some disposable bags are made from biodegradable materials (cornstarch-based films) — these work adequately but tend to be less strong and more prone to bursting under heavy pressure.
The seam (where the flat film is sealed into a cone shape) should be strong and smooth. Run your finger along the seam — it should feel flat with no raised edges that could burst under pressure. The seam is always the weakest point of a disposable bag.
What to avoid: Bags that are too thin (burst under moderate pressure, especially with stiff royal icing or thick buttercream). Bags with weak seams. Bags that aren’t food-safe (some craft-store piping bags are intended for non-food decorating materials). Bags with strong plastic odor (indicates low-grade material that may transfer taste to food).
Price range: $5-10 for a roll of 100 disposable bags. $8-15 for premium thickness bags in packs of 50-100. The per-bag cost is minimal (5-15 cents each), making them practical for any task where reusable bag cleanup would be tedious.
Care: Single use — dispose after use. Store the roll in a dry location away from heat (heat can cause bags to stick together). If using with a metal tip, cut the bag opening slightly smaller than the tip diameter so the tip wedges in securely without a coupler.
40. Timer
A kitchen timer seems almost too basic to include on a list of essential baking tools and equipment. Your phone has a timer. Your oven has a timer. Why dedicate a separate tool to this function?
Because baking timing is precise, and dedicated timers are more reliable and accessible than phone apps or oven controls in a working kitchen. Your phone gets covered in flour and becomes unresponsive to touch. Your oven timer requires navigating a control panel with greasy hands. A dedicated kitchen timer sits on the counter, visible at a glance, operable with one flour-covered finger.
What to look for: Large, readable display visible from across the kitchen. Loud alarm that you can hear over a running mixer or exhaust fan. Simple one-touch operation (start, stop, reset) that works with wet or floury hands. Count-up function (stopwatch mode) in addition to countdown — useful for tracking fermentation time. Multiple timer channels if you’re baking multiple items simultaneously. Magnetic back for attaching to the oven or refrigerator at eye level.
Materials and construction: The housing should be sealed against flour and liquid intrusion — baking environments are dusty and splashy. Buttons should be large and raised (not flush) for operation with imprecise, flour-covered fingers. The display should be high-contrast (dark digits on light background or backlit) for visibility in various kitchen lighting conditions.
Battery life should be measured in years, not months. A timer that dies mid-bake because you forgot to replace batteries is worse than no timer at all. Look for models that display a low-battery indicator well before the battery actually dies.
What to avoid: Timers with small, flush buttons that require precise finger placement (impossible with wet or floury hands). Timers with quiet alarms you can’t hear from the next room. Timers without a magnetic back or stand (they get buried under towels and ingredients on the counter). Timers with complex multi-button operation for basic functions.
Price range: $8-15 for a quality dedicated kitchen timer with multiple channels and magnetic mount. $15-25 for premium models with additional features (temperature probe integration, multiple simultaneous timers). Below $5, build quality and alarm volume suffer. A $10 timer from a kitchen supply brand serves most bakers perfectly for years.
Care: Replace batteries proactively — don’t wait for the timer to die during a critical bake. Wipe the housing regularly to prevent flour buildup in button crevices. If buttons become unresponsive, clean around them with a slightly damp cotton swab. Replace when the display dims or buttons require excessive force.
Building Your Baking Toolkit: Where to Start
If you’re starting from scratch, buying all 40 baking tools and equipment simultaneously is overwhelming and expensive. Here’s a prioritized sequence that lets you start baking immediately with a minimal investment and add tools as your skills and interests develop.
Phase 1: The Essentials (Start Here — $75-120 total)
These tools let you bake cookies, simple cakes, muffins, and quick breads:
Digital kitchen scale, measuring cups and spoons, two mixing bowls (large and medium), a whisk, a rubber spatula, a wooden spoon, a half sheet pan, a 9×13 baking pan, a muffin pan, a cooling rack, parchment paper, an oven thermometer, and a timer.
With these tools, you can execute 80% of common baking recipes competently. Everything else builds on this foundation.
Phase 2: Expanding Capability ($100-200 additional)
These tools open up pie, layer cake, and more sophisticated baking:
Round cake pans (pair of 9-inch), a loaf pan, a pie dish, a rolling pin, a pastry blender, a sifter/fine mesh strainer, a pastry brush, an offset spatula, a hand mixer, and an instant-read thermometer.
Phase 2 tools let you make pie from scratch, bake layer cakes with frosting, produce yeast breads in loaf pans, and work with pastry doughs confidently.
Phase 3: Specialization ($150-400 additional)
These tools support specific baking interests — add based on what you enjoy:
For cake decorating: piping bags and tips, cake turntable, cake smoother, springform pan, Bundt pan.
For bread baking: Dutch oven, banneton, bread lame, bench scraper.
For pastry: tart pan, pastry wheel, cookie cutters, zester/Microplane, silicone baking mats.
For serious volume: stand mixer (this single tool represents the largest investment but transforms efficiency for frequent bakers).
Phase 4: Professional Refinement
At this stage, you’re upgrading existing tools to higher quality rather than adding new categories. Replacing a hand mixer with a stand mixer. Upgrading from basic to premium piping tips. Adding specialty pan shapes for specific recipes. Building a collection of bannetons in different sizes and shapes.
This progression lets you spend money where it matters most at each stage of your baking development. A beginner doesn’t need a $300 stand mixer or a $40 Bundt pan. An experienced baker who bakes weekly absolutely benefits from both.
Material Guide: What Your Tools Should Be Made From
Understanding materials helps you evaluate quality when shopping, whether you’re buying retail or sourcing products in bulk for a business. Here’s a consolidated reference for the primary materials used in baking tools and equipment.
Stainless Steel
Used in: mixing bowls, measuring cups/spoons, whisks, bench scrapers, cooling racks, spatula blades, piping tips.
Grades that matter: 18/8 and 18/10 (chromium/nickel ratio). Higher nickel content means better corrosion resistance. 400-series stainless (used in blades and cutting tools) is harder but less corrosion-resistant than 300-series.
Quality indicators: uniform finish without pitting or rough spots. Adequate gauge (thickness) for the application. Magnetic test — 300-series stainless is weakly magnetic or non-magnetic; 400-series is strongly magnetic. Knowing which series your tool uses helps identify the grade.
Aluminum
Used in: sheet pans, cake pans, loaf pans, muffin pans.
Why it works for baking: excellent heat conductivity (distributes heat evenly), lightweight, affordable. Pure aluminum is reactive with acidic foods (tomatoes, citrus) but this rarely matters for baking applications.
Quality indicators: gauge thickness (18-gauge is commercial standard for sheet pans), flat surfaces without warping, clean edges without burrs.
Anodized aluminum: electrochemically hardened surface that’s more scratch-resistant, slightly darker, and non-reactive. Premium choice for baking pans.
Cast Iron
Used in: Dutch ovens, some specialty baking vessels.
Why it works: massive thermal mass retains heat through door openings and cold dough loading. Even heat distribution once fully preheated (though it heats slowly and unevenly initially).
Quality indicators: smooth casting without rough spots or pitting. Even wall thickness. Flat bottom that sits stable. For enameled cast iron: smooth, chip-free enamel coating inside and out.
Silicone (Food-Grade)
Used in: spatulas, baking mats, pastry brushes, muffin molds.
Why it works: heat resistant (typically 450-500°F), non-stick, flexible, non-reactive, easy to clean, doesn’t absorb odors (mostly).
Quality indicators: FDA food-contact compliant. No strong chemical odor. Smooth, slightly tacky surface feel. Uniform color without discoloration. Flexibility without tearing.
Concerns: very cheap silicone may contain fillers that reduce heat resistance and can leach at high temperatures. Test by pinching and twisting — pure silicone returns to shape immediately and doesn’t change color at the stress point. Filled silicone shows white at stress points.
Wood (Hardwood)
Used in: rolling pins, spoons, cutting boards, some tool handles.
Best species for baking tools: maple, beech, cherry, olive wood. All are dense, close-grained, and resist moisture absorption.
Quality indicators: tight, uniform grain. No knots in stress areas. Smooth finish without rough patches. Single-piece construction (no glue joints in the working area). Adequate weight for the application.
Avoid: softwoods (pine, poplar, balsa) that splinter, absorb moisture, and harbor bacteria. Bamboo is acceptable but can splinter along its fibrous grain if manufacturing quality is poor.
Glass (Borosilicate and Tempered Soda-Lime)
Used in: measuring cups, pie dishes, mixing bowls, baking dishes.
Borosilicate (Pyrex in some markets): resistant to thermal shock, lighter, more expensive. Can handle temperature transitions that would crack soda-lime glass.
Tempered soda-lime (most modern “Pyrex” in the US): less thermal-shock resistant but shatters into small pieces rather than sharp shards (safety feature). Heavier. Less expensive.
Quality indicators: uniform thickness without thin spots. No bubbles or inclusions visible in the glass. Flat bottoms that sit stable. Clear markings (for measuring cups) that are fired into the glass, not painted on.
How to Spot Quality When Shopping
Whether you’re buying a single whisk at a kitchen store or evaluating manufacturers for bulk sourcing, these physical quality indicators help you distinguish good baking tools and equipment from poor ones.
The Weight Test
Pick up the tool. Does it feel substantial for its size? Heavier generally indicates thicker material (better gauge metal, denser wood, more silicone). A whisk that feels like a toy will perform like one. A sheet pan that feels flimsy will warp. Weight isn’t everything — a tool can be too heavy for comfortable use — but unexpectedly light weight is almost always a red flag.
The Flex Test
For tools that should be rigid (bench scrapers, sheet pans, measuring cups): try to flex them. Quality tools resist flexing. Cheap tools bend easily. A sheet pan that flexes in your hands will warp in the oven. A measuring cup that flexes holds inconsistent volume.
For tools that should be flexible (spatulas, whisks): flex them and release. They should return to their original shape immediately and completely. Permanent deformation after gentle flexing indicates material that will fail quickly under regular use.
The Connection Test
Examine every point where two parts join: handle to blade, wire to frame, bowl to handle. Pull gently. Twist gently. Quality connections don’t move, rattle, or show gaps. Weak connections are the primary failure point of cheap tools — the handle separates from the spatula head, the whisk wires pull from the handle, the measuring cup handle bends away from the cup.
The Surface Test
Run your fingers over all surfaces that contact food. They should be smooth, uniform, and free of rough spots, burrs, sharp edges, or manufacturing defects. Rough surfaces trap food and bacteria. Sharp edges cut you or damage other tools. Manufacturing defects (pitting, uneven coating, visible weld splatter) indicate poor quality control that likely extends to aspects you can’t see.
The Symmetry Test
Tools that should be symmetrical (round pans, circular whisks, straight spatula blades) should actually be symmetrical. Hold pans at eye level and check for warping. Look down the length of spatula blades for bowing. Check that whisk wires are evenly spaced. Asymmetry in new tools indicates poor manufacturing that will worsen with use.
The Smell Test
New tools should smell like their materials — metal smells metallic, wood smells woody, silicone has a faint neutral odor. Strong chemical smells from silicone, plastic, or coated tools indicate off-gassing of manufacturing chemicals that may not be food-safe. Off-gas strongly-smelling tools by baking them empty at their rated temperature before first food use. If the smell persists after off-gassing, return the product.
When I’m conducting quality control inspections at manufacturing facilities, these same tests — applied systematically across production samples — reveal whether a factory maintains consistent quality or cuts corners. The physical indicators of quality are the same whether you’re checking one whisk at a retail store or inspecting a container of 5,000 whisks at a factory warehouse. Read also the FDA guidelines
You can contact us for inquiries about baking tools and equipment.